Showing posts with label sugar. Show all posts

Saturday

Butterscotch Sauce!

On a night out with my friends several years ago, the question "If you were an ice-cream, what flavour would you be?" came up, and mine was butterscotch by general consensus. Recently, this came up again with an entirely different group of people, and the answer was still butterscotch! I suppose I haven't changed much... sickly sweet, burns the tongue if you don't take your time and wait for it to cool, slightly salty, drizzles smooth when warm... yeah, I kinda like being butterscotch.

But up until now, I have never made butterscotch! I've always relied on storebought butterscotch chips, but for some reason, when I woke up today, I just wanted to make my own butterscotch sauce. So I'll share the surprisingly easy recipe here.


Homemade Butterscotch Sauce
Yield: 2 cups
  • 60g butter
  • 1 cup packed light brown sugar
  • 3/4 cup cream
  • 1 tbsp vanilla
  • Pinch of sea salt
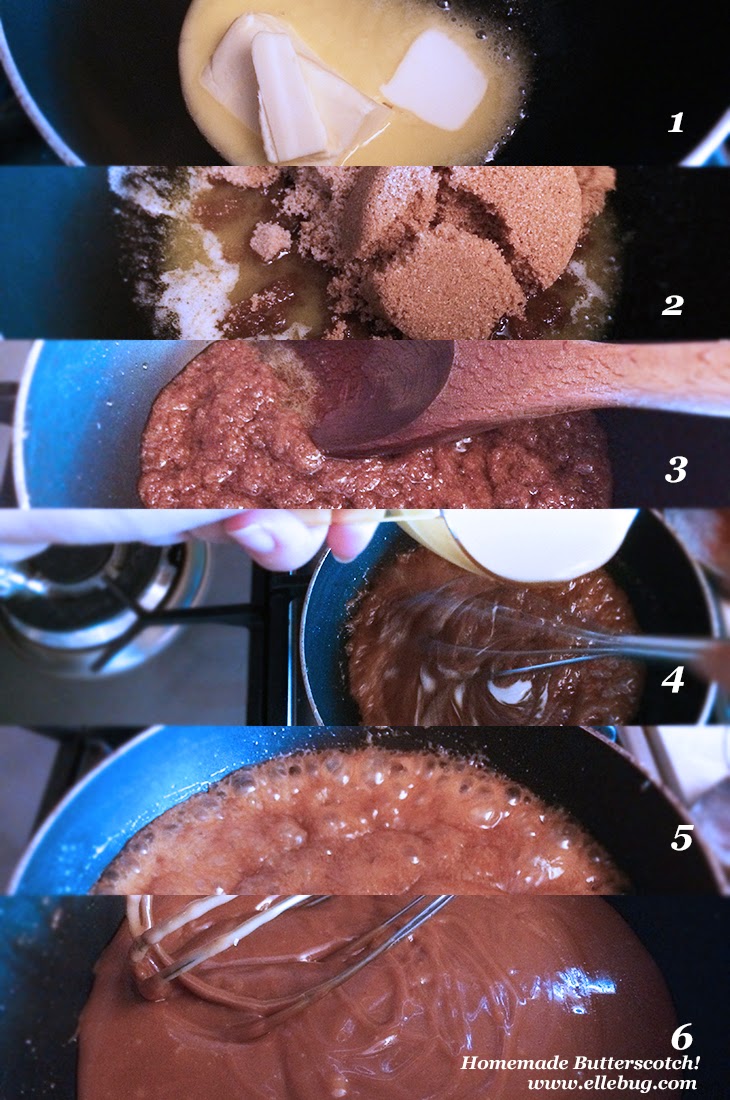
  1. In a saucepan (preferably one with a rounded bottom), heat the butter on medium until melted
  2. When the butter has mostly melted, add the sugar and stir with a wooden spoon for a few minutes
  3. When the texture resembles the picture in step 3 above (sandy, stir-able, but not too runny) sub your wooden spatula for a whisk and move onto step 4
  4. Turn the heat down to low and gradually add in the cream while whisking to incorporate steadily, you don't want to let it curdle as the cooler milk hits the hot sugar and butter
  5. When all the milk has been added, turn the heat up to medium again and let it boil for up to 10 minutes, whisking occasionally so it doesn't burn and blends nicely
  6. Remove from heat, let it cool for about 5 minutes before transferring to a glass bowl and stir in the vanilla and salt. Add more salt if you want a saltier flavour, but I like just a little touch to bring out the flavours
Serve over a warm slice of home made sticky date pudding! Or chocolate cake! Or on a cracker!

Sunday

Apple Crumble Cake


Freshly baked cake, sweet and tangy fruits, cold ice-cream. Is that not one of the most comforting combinations you can imagine? If you're like me and find comfort in the act of baking (and then enjoying the spoils of that well spent afternoon), this is one recipe you should try. It's easy enough to whip up in less than 15 minutes, but takes up enough of your energy that it works perfectly to shut down the background noise going on in your head.

I've baked four of these cakes in the past 3 days (one for an order, one for an office potluck lunch, one for my mum, and another for an aunt) and have gotten to enjoy approximately 3 bites of it. Sometimes I wonder if I bake because I love desserts, or if I bake to distract myself from myself. I'm not entirely sure what I'm feeling right now, and to be honest, I'm not too keen to confront it just yet. Work has been fantastically rewarding lately, pushing me to my known limits of existing knowledge and making me learn a lot more as I go along, and I'm loving every single second of it.

You know, I should probably edit this entry to talk of something more meaningful, but you're not here to read about my life. So I'm going to just give you the recipe you came for.


Apple Crumble Cake
adapted from Valli Little's recipe on Delicious. au
Preheat oven to 180C and line a 9" springform tin with baking paper and butter

The cake:
  • 145g softened butter
  • 1 cup caster sugar
  • 1tsp vanilla bean paste
  • 2 large eggs
  • 2 cups all purpose flour
  • 2 tsp baking powder
  • 1/2 cup cream
  • 3/4 cup milk
  • 2 granny smith apples, peeled, cored, sliced
The crumble:
  • 50g cold butter, cubed
  • 1 cup almond flour
  • 1/2 cup caster sugar
  • 2 tsp ground cinnamo
  1. For the cake: Pop the butter and sugar in your electric stand mixer and beat until fluffy, then add the eggs and vanilla bean paste and beat until incorporated. Scrape the sides of the bowl, and add the flour, baking powder, cream and milk in one go and beat with the paddle attachment until fully incorporated. Transfer the batter into your prepared cake tin and arrange the apple slices on top. 
  2. The crumble: Rub the butter and flour with your fingers until they resemble coarse crumbs. Stir the sugar and cinnamon through the crumble with a fork. Pour the crumble over the apples and cake and bake for 1 hour 20 minutes. Cool slightly and serve with ice-cream!

Friday

Chocolate Sugar Cookies


My very good friend, Soraya, left to do her MBA in NYC last week (conflicted emotions, on one hand super happy for her, on the other totally envious and sad that I don't get to hang out with her for a while) and considering she's been asking me for cookies for almost a year... I whipped her up an batch of Dinosaur Chocolate Sugar cookies (the cookie cutters were hers) and decorated them with colourful royal icing.

Typically, I forgot to take pictures of the adorable little dinosaurs, so I had to whip up another batch last night (sans dino cookie cutters as I've returned those to Soraya) to share the recipe with you lot. It's super easy, and so yummy and great for a simple snack. I brought a few tins of the stuff to the office today and am hoarding a smaller tin for my cubicle mates.

Chocolate Sugar Cookies

  • 360g flour
  • 75g cocoa powder
  • 1/2 tsp salt
  • 1 tsp baking powder
  • 227g unsalted butter, softened
  • 350g caster sugar
  • 2 large eggs
  • 2 tsp vanilla extract


  1. Combine the flour, cocoa powder, salt, and baking powder in a medium sized bowl and set aside
  2. Cream the butter and sugar with your mixer until light and fluffy, about 4-5 minutes, then beat the eggs in one at a time. Add the vanilla and beat in again until the mixture has incorporated and looks fluffy and white
  3. Dump the flour mixture in and beat on medium speed until combined
  4. Turn the batter out onto a piece of cling wrap and double wrap it before popping it in the fridge to chill for an hour
  5. When ready to bake, preheat the oven to 180C and line your baking trays with baking paper (I recommend preparing 4 trays so you can keep baking and cutting at the same time)
  6. Take out half of the dough and put the rest back into the fridge, roll out onto a lightly floured surface. You may need to knead the dough a little to keep it firm. Cut out your desired shapes, then transfer them to the baking trays. Chill the cut out cookies in the fridge for about 10 minutes before popping them into the oven, and bake for 10 minutes for a slightly chewier cookie, or up to 12 minutes for a crunchy one
  7. Cool completely on a wire rack before storing in airtight containers or pretty cookie tins you picked up one night in Ikea when you weren't meant to be shopping for anything
  8. You may choose to eat them plain, or pipe with royal icing, or slather on some buttercream/chocolate ganache & pistachio sprinkles

Saturday

Some Like it Cold


Some of you may remember the friend I posted about not so long ago who left our consulting firm to start up his own ice-cream business, Mr Tat Wei. He recently finalised the brand and company name, and has been making waves in the desserts and treats loving community of KL (that's Kuala Lumpur, the big city of Malaysia). A few bloggers have already started reviewing his new flavours, and have done a great job of providing the technical background of his flavour and skills. So as I don't pretend to know a lot about food (except to know what I like) I'm going to jump right onto that delicious bandwagon by showing the different ways you can enjoy Forty Licks Ice-cream! Everyone, dessert lovers, overheated people of Malaysia, I hope you throw out your half-eaten cartons of whatever store bought ice-cream you currently have sitting at the back of your freezer, and order yourself a carton (or be like me and get 3!) of handcrafted, extravagant ice-cream from Forty Licks, cos one lick is never enough ;) 
Congratulations again, Tat, you know that despite my slight envy that you're doing exactly what you're passionate about at the moment, I'm also incredibly happy for you and so excited to watch the business grow into everything you dream it to be. I love your ice cream, and love you, Tat! You know that we all know you can totally rock this!
I thought to celebrate this landmark achievement with one of my personal favourite flavours by him: Earl Grey tea. This flavour and I have history, as I like to believe that I inspired him into crafting this flavour to go with my Earl Grey cupcakes (though he already mentioned it before LOL).
This time, I'm going to pair his ice-cream with lemon sugar cookies fresh from the oven. Imagine the freshly made ice-cream sitting in between two soft, hot, crumbly cookies. Mmmmm what a way to spend a Saturday evening! 
If you're going to have Earl Grey, you had better do it properly and have it with lemon. 
Lemon Sugar Cookies
Recipe from Life and Kitchen
  • 2 3/4 cup all purpose flour
  • 1 tsp baking soda
  • 1/2 tsp baking powder
  • Pinch of salt
  • Zest of 2 lemons
  • 1 1/2 cup caster sugar
  • 1 cup unsalted butter, softened
  • 1 large egg
  • 1/2 tsp vanilla extract
  • 2 tbsp freshly squeezed lemon juice
  • Shallow bowl of caster sugar, for rolling (optional)
  1. Preheat the oven to 180C and line baking trays with parchment paper
  2. Whisk the flour, soda, baking powder, and salt in a medium bowl and set aside
  3. In a large mixing bowl, beat the butter and sugar with the paddle attachment until fluffy
  4. Beat in the zest, egg, vanilla, and lemon juice
  5. Roll tablespoon portions of the dough into balls and into the sugar before popping them only the baking tray
  6. Bake for 10 minutes, remove and leave to cool completely on a tray, THEN scoop out an appropriate amount of Forty Licks' Earl Grey ice cream and sandwich it in between two cookies. Eat immediately. 

It's been so long since I've enjoyed an ice-cream sandwich, and having it fresh from the oven with homemade ice-cream from a good friend is even better! I was babysitting my siblings this afternoon while playing in the kitchen, so I obviously called them in to be my minions. We had so much fun making these neat little ice-cream sandwiches, then racing to eat them before the ice-cream could melt. The lemon flavour in this cookie is strong too, though in future I might not roll it in sugar to counter the sweetness of the ice-cream. 

Back to Tat Wei's ice-cream, friends in KL, if you're going to make Earl Grey cake or lemon cookies, I recommend that you order a pint of Forty Licks' Earl Grey and go all out. He's got a range of amazing flavours, most of which I have tried, though my personal favourite is the Salted Caramel. My mum is a huge fan of his Honey ice cream, my dad loves his Earl Grey, and my brother goes nuts for the Dark Chocolate and Peanut Butter. 
He also does sample individual-serve cups, so you can order a variety of flavours to test. This is something new that I haven't tried yet, as I already know which flavours I dig so I just go and get a whole pint. But for my dad's upcoming birthday, I may be ordering some individual cups to give out to guests, and also something for me to whip up a fancy dessert with. 
Coming up, a special recipe incorporating Forty Licks' Pistachio ice-cream! 

To order or gush over Forty Licks if you're already a follower (I make it sound like a cult, which it kind of is in our office), check out his facebook page, bookmark his upcoming website (it's in construction, so watch that space), and follow him on twitter if you're a proper addict:

All the best, Tat Wei, and hope you don't forget us little people when you  reach the top. 
xx Nabs

Friday

Wilton's baked doughnuts with cinnamon sugar glaze

I had my aunt round for tea a few days ago and was messing about in the kitchen with all my baking utensils and decorative plates when I realized (quite belatedly) that there was a recipe on the packaging of the doughnut pan! Well, duh, Nabiya, it was right next to the pricetag... Which, I'm sure I looked at when I bought the damned thing.

I won't even pretend to have a reason for baking these days, as I seem to take selfish pleasure in doing it. It is oddly relaxing, my solitary place, and seems to make people around me happy (discounting the handful who whinge about their calorie-intake, yet still continue to eat the goodies). In this past year, I've found so much comfort in baking, and I suddenly feel like I have something to be passionate about. It feels damned great to find one's calling.

I digress, nobody cares about my strange love affair with desserts, let's get on with the recipe:

Wilton's baked doughnuts recipe
Yield: approximately 12
  • 2 cups all purpose flour
  • 3/4 cup caster sugar
  • 2 tsp baking powder
  • 1/4 tsp ground nutmeg
  • 1 tsp salt
  • 3/4 cup buttermilk
  • 2 large eggs, lightly beaten
  • 1 tsp vanilla
  • 2 tbsp butter, melted
  1. Preheat the oven to 180C, grease your doughnut pan and set aside
  2. In a large mixing bowl, combine the flour, sugar, baking powder, nutmeg and salt
  3. Add the eggs, vanilla, buttermilk and melted butter and beat until just incorporated (I did the whole thing by hand, you may choose to use an electric mixer if you wish)
  4. Pour all the batter into a piping bag for ease of filling the pan, cut a hole around the circumference of your pinky fingertip, and fill the doughnut pan 2/3 of the way up
  5. Bake for 7-9 minutes or until the top of the doughnuts spring back up when lightly pressed with a finger
  6. Cool for 3 minutes in the pan then pop them out to cool on a wire rack

Cinnamon sugar glaze
  • 2 tbsp fine granulated sugar
  • 1 tbsp cinnamon powder
  • 2 tbsp butter, melted
  1. Mix the sugar and cinnamon in a bowl
  2. In a separate, flat bottomed bowl, melt the butter
  3. Dip the doughnuts in the butter, then roll around in the cinnamon sugar
  4. Serve immediately if possible as baked doughnuts are SO good when warm and fresh from the oven
My family quite enjoyed these, and I'm getting a craving for one from just typing up this post! If you get yourself a doughnut pan, I insist that you give these a shot. I made minor tweaks, as I have no cake flour and I added vanilla as I dislike the eggy taste you sometimes get.

Happy Friday, friends, and enjoy your baking weekend!

Much love, Nabs

Monday

Amanda's Sugar Cookies

Photobucket
I posted a similar recipe before that I adapted from my aunt's, but this time I decided to try out Amanda from iambaker.net's recipe. I wasn't up for adding frosting, especially considering these cookies are just so delicious when plain. I whipped up two batches that day, and I have to say that mixing this dough with a kitchenaid is ten times more satisfying than using a hand mixer.
Photobucket
Never before have I managed to create such a solid dough, it just mixes and incorporates everything so well!
Photobucket
Best item I own, by far.
Amanda's Sugar Cookies
  • 3/4 cups butter, softened
  • 1 cup white sugar
  • 2 whole eggs
  • 1 1/2 tsp vanilla extract
  • 2 1/2 cups all-purpose flour
  • 1/4 tsp cream of tartar
  • 1 tsp baking powder
  • 1/2 tsp salt
Photobucket
  1. In a large mixing bowl, beat butter until fluffy, then gradually add in sugar until you achieve a smooth and creamy mixture
  2. Add eggs one at a time, beating well after each addition, then add in the vanilla and almond extract
  3. In a separate bowl, sift the flour, cream of tartar, baking powder and salt
  4. Add the flour mixture to the butter mix a cup at a time, beating at medium speed with the paddle attachment the whole time, mix until fully incorporated
  5. Drop the dough onto a large piece of cling wrap, fold it tenderly like you would clothe a baby (I even baby talked at it, the dough was so cute!) and refrigerate for at least an hour
  6. After you've showered, watched an episode or two of Community and dried your hair, (lol in other words: when you're ready) roll out the dough on a lightly floured surface til it's around 1/4 inch thick, cut out your cookie shapes and pop in the oven
  7. Bake at 180C for around 8-10 minutes.
Photobucket
Delicious! I brought a tupperware full of these cookies to work and they've been my perfect tea-time snack during the days.
Thanks, Amanda, for sharing this great recipe!
x Nabs