Showing posts with label easy. Show all posts

Wednesday

Tomatoes, mozzarella and toast!


I've been seeing a lot of pictures of tomatoes on burrata on Instagram and Pinterest lately, and I'm not sure if it's just having a revival at the moment or the interwebz is reading me again. But after days and days of seeing variations of these flavours every time I check my social media, I had to have it.

Only problem is, I couldn't find burrata anywhere! Dagnabbit! This wasn't going to deter me, though, so mozzarella it is!

Here's a recipe I love to make for my husband and I when we can't decide what to have for dinner, or for a weekend lunch.

Braised tomatoes on mozzarella with toast 
(serves 2)
  • A healthy glug of olive oil
  • 2 pints cherry tomatoes
  • A fistful of roughly chopped basil
  • 4-5 smashed cloves of garlic
  • A pinch of sea salt
  • 2 balls of mozzarella
  • Crusty toast 
  1. Heat the olive oil in a braiser or pan, doesn't have to be fancy, add the tomatoes, basil, garlic and sea salt, cover and simmer on low-medium heat for 20 minutes. 
  2. Uncover, pop in the oven under the broiler on medium heat for about 5 minutes
  3. Remove from the oven, and pour over the mozzarella (or even better if you have burrata!) in a bowl and serve warm with toast 

Easy peasy, and super satisfying!

Saturday

Jeera Rice (Cumin Rice)


I come from a multiethnic family - with a strong influence by my Indian paternal grandmother, as she is the matriarch of our large and boisterous family. This influence shows itself a LOT through our food preferences - dad to this day can't go 3 days without having dhal (the special dhal recipe Nini passed down to all of us, not just any old random dhal you can get at a Mamak store in Malaysia), and my absolute favourite food in the whole wide world is tandoori chicken. With all the trimmings.

So when it comes to cooking, as much as I love cooking western food, the most common type of Asian food I would cook is Indian food - not only is it familiar and therefore easy, it's also damned delicious! I'm about to share a series of different Indian food recipes (as Nini makes them) in the next few posts, but I'll start with the easiest and most basic of all - rice. There are many types of rice that you can cook, but this is my favourite as it also uses the best spice in the world - Cumin.

Jeera Rice
Serves... 2 if you're hungry, 4 if you're on diet

  • 1 bay leaf
  • 3 cloves
  • 2 cardamom pods
  • 1/2 cinnamon stick 
  • 1 1/2 tbsp cumin seeds
  • Pinch of salt 
  • 1 cup basmati rice
  • 2 cups water, room temp


  1. Heat a tbsp of coconut oil (or vegetable oil, doesn't have to be fancy) in a saucepan and add all the spices once hot. Toast the spices for about 3 - 4 minutes. 
  2. Add the rice and stir to mix with all the spices, and continue to toast for about 2 - 3 minutes - I don't know why, it may have something to do with how the flavours mix together. Add the water and pinch of salt, cover and keep on a low heat for 15 minutes. 
  3. At the 15 minute mark, remove the lid, turn off the heat and fluff up the rice with a fork. You can keep the lid on to retain heat or serve immediately with a garnish of chopped cilantro and your favourite curries. 

Easy no? I also do this with quinoa when I'm feeling extra guilty. The trick to using quinoa is to ensure you wash it thoroughly before cooking and also to toast it (step 2) for slightly longer (4 - 5 mins) until you hear a soft popping sound and a nutty smell arises. Then add the water and cook for 15 minutes too.

Thursday

Cranberry and Almond Granola


I've been on this 1500 calorie a day thing for a few weeks now, and plan on keeping it up for a long time so I've been trying to find ways to manage my snacking - which really is the biggest problem area for me! Some of the stuff I've done is swapped out all milk chocolate for dark chocolate only (lucky I already love dark choc!), cutting out cakes and cookies that I don't know for a fact are totally worth the calories (you know what I mean? Only the great stuff!), and no sweet, flavoured or sugary drinks. 

Last night I decided to make some granola for my night time TV snacking (in our house it's Netflix and Snack) and I have to say I'm really pleased with this specific mix and baking times. The last time I made my own granola it was a bit too crunchy and I think I burnt some of the components. 

Without further ado, here's the recipe for my Cranberry and Almond Granola:

Yield: 3 cups granola

Ingredients:
  • 1/4 cup pure maple syrup
  • 3 tbsp melted coconut oil 
  • 2 tbsp honey 
  • 1 + 1/2 tsp pure vanilla extract 
  • 1/4 tsp sea salt 
  • 1 + 1/2 cup sliced almonds 
  • 2 cups old fashioned rolled oats
  • 1 cup dried cranberries*
Method:
  1. Preheat the oven to 150°C/fan and line a baking tray with parchment paper
  2. In a large bowl, whisk the maple syrup, coconut oil, honey, vanilla and salt until thoroughly mixed 
  3. Add the rolled oats and sliced almonds and stir to coat everything in the maple mixture
  4. Spread the mix out on the prepared baking tray (I just used a standard cookie sheet) and pop in the oven for 20 minutes. Remove from the oven at the 20 minute mark and toss the granola with a forked spatula to "turn" them in a way, and then put it back in the oven for 5 - 10 minutes*
  5. Remove from the oven and allow to cool for about 10 minutes before adding the cranberries, use a fork or spatula to stir so that it mixes well. Then store in an airtight jar or container and it should keep for 2 weeks max 
*Notes:
  • You can use other dried berries of your own preference, I've also done this with chocolate chips and coconut flakes!
  • For step 4, if you feel after 20 minutes that it has toasted to your preferred crispiness, then stop there.

Sunday

Upside-down Orange Almond Cake


One of my colleagues sells fresh fruits that he sources from his various contacts at the market, and when he recommends a specific produce to me I always say yes cos I know they'll be amazing. So last week when he told me he had Cara Cara oranges in stock, I said "how many?". Fast forward to the weekend (after I've had quite a few fresh slices as well as OJ), I still had a lot left over.

So I went on a bit of a baking binge over the last 24 hours, and made not one - not two - but three different recipes featuring oranges! First of all, I'd like to share one of my dad's favourite afternoon tea treats:

Upside-down Orange Almond Cake
  • 2 cups almond meal
  • 2 cups all purpose flour
  • 2 tsp baking powder
  • 1/2 tsp salt
  • 320g unsalted butter, room temperature
  • 1 1/3 cup caster sugar
  • 4 eggs
  • 3 tbsp natural Greek yoghurt
  • Zest of 2 oranges
  • A thinly sliced orange
Butterscotch:
  • 1 cup brown sugar
  • 1/2 cup butter 
  • 1/2 cup heavy cream
  • 1/2 tsp salt
  1. Preheat oven to 180C, and line a 9" springform tin with non-stick paper
  2. For the butterscotch: In a heavy saucepan, combine the butter and brown sugar over a medium-low heat until it turns into a sandy like texture, then slowly whisk in the cream and salt until the mixture thickens. Pour the butterscotch on the bottom of the prepared tin and line the bottom and sides with the thin slices of orange (starting in the centre and working your way around)
  3. For the cake batter: 
  4. Combine the almond meal, flour, baking powder and salt in a medium bowl and set aside. 
  5. Whisk the butter and sugar together in a large mixing bowl until light and fluffy, then beat the eggs in one at a time. Add the yoghurt and orange zest and beat until thoroughly combined, then fold in the dry flour mixture until everything is just wet. Pour batter over the orange slices, level, and pop in the oven for 60 - 70 minutes. 
  6. Remove from the oven and allow the cake to cool in the tin for about 10 - 15 minutes before upturning onto a wire rack to cool completely. 
  7. Serve with tea :) 
I also apologise for the lack of good-quality photoes but I realise that between my job and family obligations... I don't really have all the time I used to for setting up the perfect shots despite how much I want to. I feel that I keep using that as an excuse to not post anymore. I miss blogging, really, just the seemingly senseless activity of talking to myself. So I hope you guys don't mind... I just really love having this outlet.

Much love, hope you enjoy the recipe and cake!

Monday

Brown Butter Sage Gnocchi with Beef Salami


I went back to work last week, and it's not quite so busy yet but still calls for the usual later evenings. So on Friday night, after a week of craving (quite inexplicably) gnocchi, I decided to cook up this super simple, super easy, super tasty dish for the hubs and myself.

Also, since I've done less and less baking and more and more quick weeknight cooking, I thought I'd start sharing more of those recipes (assuming I figure out my lighting issues for photography at night). So for all you working people out there who want to whip up quick, no fuss dinners for yourself or to impress your significant other with your culinary skills, here's one of many weeknight dinner recipes I aim to share.

Brown Butter Sage Gnocchi with Beef Salami
  • 500g gnocchi 
  • 2 tbsp unsalted butter
  • 2-3 tbsp chopped sage (dried or fresh)
  • 3-4 tbsp grated parmesan
  • Salt and pepper, to taste
  • Salami, rough chopped (optional)
  • Flat leaf parsley to garnish (optional, basically I had some in the fridge I didn't want to go bad)
  1. Cook the gnocchi according to the packet's instructions (pop in a pot of boiling, salted water and strain as soon as they come to the top). 
  2. Melt the butter in a skillet, add the sage and let it cook til it begins to brown and the sweet, nutty aroma of browned butter starts to fill your senses (can you tell that I love brown butter?). Toss the cooked gnocchi into the butter, along with two tbsp of the grated parmesan. Season to taste
  3. Optional: Add the salami to the skillet and stir to mix and coat everything in delicious buttery goodness. 
  4. Serve immediately with another generous sprinkling of parmesan, and if you, like me, have leftover parsley you don't want to waste, toss that on too. Why not? 

Sunday

Pancakes!


I woke up on Saturday to the sound of birds chirping outside my bedroom window, the scent of fresh flowers by my bedside (heh, thanks awesome Bath & Bodyworks scent diffuser), and the sound of a Disney princess trill when I realised that I'm on holiday! It's the end of the year and I get to totally just chill!


So what does one do when one is faced with endless hours of doing absolutely nothing? Why, make pancakes, of course! Nothing fancy needed, just your basic pancakes that takes 5 minutes to whip up. This is one of those breakfast recipes that will have you sitting at the table in no more than half an hour from when you drag yourself out of bed.

Just Pancakes
Makes enough for 3 - 4 people (depending on how high you stack'em)

  • 1 cup all-purpose flour
  • 1/4 cup caster sugar
  • 1 tsp baking powder
  • 1/2 tsp ground cinnamon
  • 1 large egg
  • 1 tsp vanilla extract
  • 1 cup milk 

Mix all the dry ingredients in a bowl, whisk in the egg and vanilla, then gradually whisk in the milk. Let the mixture sit for about 5 minutes while you heat up a large skillet or griddle.
Brush some butter over the surface of the heated pan and pour the batter out in 1/4 cup batches for each pancake. When the bubbles on the top have popped and left behind little holes in the pancake, flip it over and leave it for about 1 minute to just brown the other side.
Serve with butter, maple syrup and fresh fruits if you have any.
Enjoy!


Easy Chocolate Cinnamon Rolls


On Sunday, I woke up with a whole day ahead of me and no rush to do stuff by Monday. So I set to the task of making cinnamon rolls, using the recipe I posted two years ago, with the addition of chopped balsamic strawberries snuck into the dough. As much as I love the result of that recipe, the fact remains that it took me a full five hours from start to finish.

See, I love cinnamon rolls, but I make no secret about the fact that I am one of the laziest people in the world (okay, total exaggeration). So I searched for another recipe that would only require one hour (one and a half, at a push), and my other must have is that the recipe uses yeast instead of baking powder or baking soda. There's just something about it, you know? Cinnamon rolls are essentially a bread... so, I want the bread texture that yeast yields but minus the half day of waiting.


I found just the right one, after searching for two days and trying out multiple recipes (thank God for large families!); I think this is it. This works perfectly, and dare I say it... is actually better than my previous one! So without further ado, here's the recipe, adapted from Sally's Baking Addiction.

Chocolate Cinnamon Rolls with a Dark Chocolate Glaze
Yields 12(ish) rolls

  • 2 3/4 all purpose flour
  • 3 tbsp caster sugar
  • 1 teaspoon salt
  • 2 1/4 teaspoons instant dried yeast
  • 120ml water
  • 60ml milk 
  • 40g unsalted butter
  • 1 large egg, lightly beaten
  • Cocoa powder for dusting
Filling:
  • 40g unsalted butter, softened to room temperature
  • 1 tbsp ground cinnamon
  • 2 tbsp caster sugar
  • 1/2 cup dark chocolate chips
Dark Chocolate Glaze (actually a simple ganache):
  • 1/4 cup double cream
  • 150g dark chocolate, chopped
  1. Mix 2 1/4 cup flour, sugar, salt, and yeast in a large bowl and set aside. Reserve 1/2 cup flour for step 3
  2. Heat the water, milk, and butter in a heavy bottomed saucepan then pour into the flour mixture and stir with a wooden spoon to get all the ingredients wet
  3. Add the egg and the reserved 1/2 cup flour, mix until a soft dough forms
  4. Turn the dough onto a lightly floured surface and knead for 3-4 minutes, then place the dough in a lightly greased bowl (wipe down a large mixing bowl with some oil or butter). Allow to sit for 10 minutes
  5. After 10 minutes, roll the dough out into roughly a 14x8 rectangle, spread the butter over it and sprinkle with the cinnamon sugar mix (stir the cinnamon and sugar together into a small bowl), and dark chocolate chips
  6. Roll the dough (long edge) into itself and cut the log into 1 inch pieces, arrange the rolls cut side up in a lightly greased and floured 8" round baking tin. Cover the rolls with a clean cloth and allow to sit in a warm, dry place for 1 hour
  7. When the hour is up, the dough should have plumped up into fat little rolls, preheat the oven to 180°C, brush the top of the rolls with milk and dust with cocoa powder and bake for 25 minutes, or until the tops are a golden brown
  8. Cool the rolls on a wire rack for 10 minutes. In the meantime, make the dark chocolate glaze by heating the cream in a saucepan, then pour over the chopped chocolate and stir until it melts and comes together. Pour the glaze over the rolls right before serving and enjoy! 

Saturday

Butterscotch Sauce!

On a night out with my friends several years ago, the question "If you were an ice-cream, what flavour would you be?" came up, and mine was butterscotch by general consensus. Recently, this came up again with an entirely different group of people, and the answer was still butterscotch! I suppose I haven't changed much... sickly sweet, burns the tongue if you don't take your time and wait for it to cool, slightly salty, drizzles smooth when warm... yeah, I kinda like being butterscotch.

But up until now, I have never made butterscotch! I've always relied on storebought butterscotch chips, but for some reason, when I woke up today, I just wanted to make my own butterscotch sauce. So I'll share the surprisingly easy recipe here.


Homemade Butterscotch Sauce
Yield: 2 cups
  • 60g butter
  • 1 cup packed light brown sugar
  • 3/4 cup cream
  • 1 tbsp vanilla
  • Pinch of sea salt
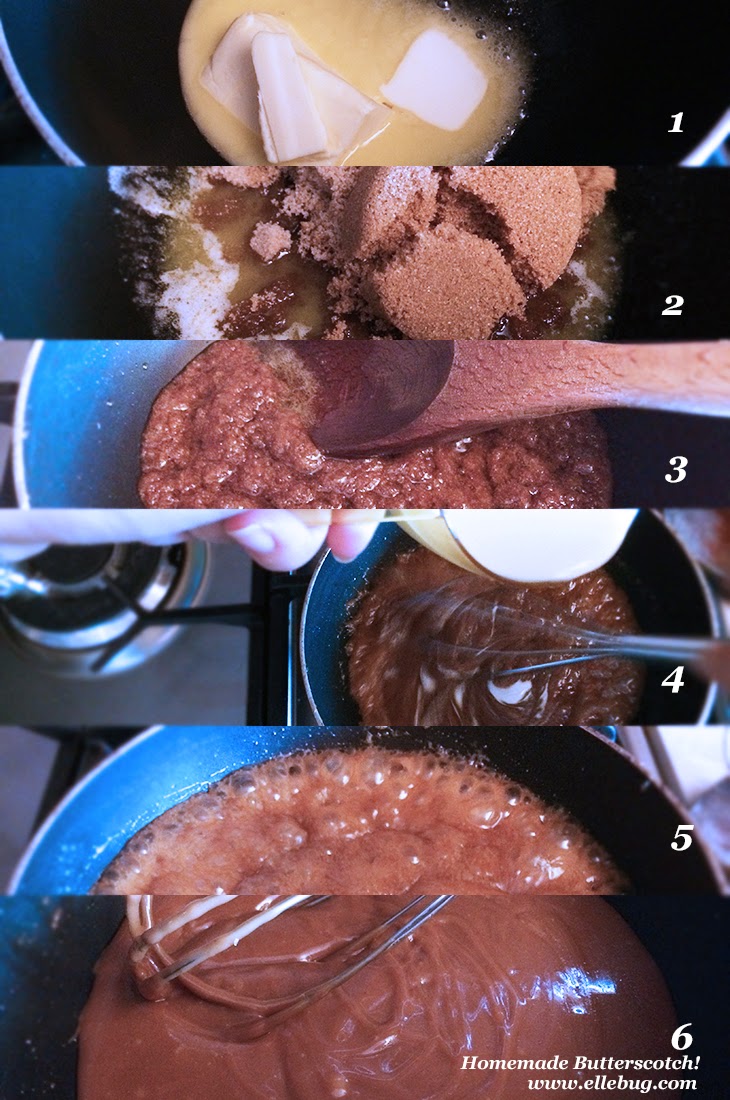
  1. In a saucepan (preferably one with a rounded bottom), heat the butter on medium until melted
  2. When the butter has mostly melted, add the sugar and stir with a wooden spoon for a few minutes
  3. When the texture resembles the picture in step 3 above (sandy, stir-able, but not too runny) sub your wooden spatula for a whisk and move onto step 4
  4. Turn the heat down to low and gradually add in the cream while whisking to incorporate steadily, you don't want to let it curdle as the cooler milk hits the hot sugar and butter
  5. When all the milk has been added, turn the heat up to medium again and let it boil for up to 10 minutes, whisking occasionally so it doesn't burn and blends nicely
  6. Remove from heat, let it cool for about 5 minutes before transferring to a glass bowl and stir in the vanilla and salt. Add more salt if you want a saltier flavour, but I like just a little touch to bring out the flavours
Serve over a warm slice of home made sticky date pudding! Or chocolate cake! Or on a cracker!

Passionfruit Curd


I seem to have a newfound obsession with passionfruit this year. Last year I couldn't get enough of raspberries, but it looks like 2014 will be a year of this gorgeous, tangy and tart fruit! My current favourite thing is this gorgeous passionfruit curd I whipped up in 15 minutes on a weeknight last week to act as a filling for a friend's birthday cake. I overdid it though (as I am wont to do) and made too large a batch, so I've been spreading this beautiful curd on toast, rolling it in my pancakes, and dolloping it on fresh vanilla cupcakes. Certainly doesn't do a body good to have jars of this stuff lying about...

Anyway, here's sharing what is likely to be the base of many recipes to come.

Passionfruit Curd (or butter)

  • 200g passionfruit pulp
  • 1 tbsp freshly squeezed lemon juice
  • 3 large eggs
  • 140g butter, diced
  • 200g caster sugar
  • 2 tbsp cornflour
  1. Strain the passionfruit pulp to get the juice from the seeds, set the strained seeds aside in a bowl for later
  2. In a heavy saucepan and over a low heat, combine all the ingredients and gently stir until the butter has melted, then continue to whisk over low heat until it thickens. Shouldn't take more than 5 minutes to thicken. 
  3. Remove from the heat, pop into a bowl, swirl in about 2 or 3 tbsp of the reserved seeds (this is optional, you can do without the seeds) and cool before storing in airtight jars and containers in the fridge

Sunday

Easy homemade lemon curd


Sundays tend to tread the very thin line of sadness and happiness, leaving most of us wistful for the short break we just wasted. Not to say that every weekend is wasted, simply that by 5pm on a Sunday afternoon you try to think of what you did all weekend only to come up with a list of things you didn't have enough time to do.

Okay, enough with the sob story. I had a really good weekend; lots of time to read, write, bake, and even got to spend quality time with some friends over some really good meals. What really captured the beauty of my time off was this wonderful lemon curd I made to just have on hand when I feel a little blue. There's nothing quite like fresh, home made lemon curd to spread on a hot pancakes, a piece of toast, or in between two fresh sponge cakes.

Lemon curd is easily accessible in supermarkets, but for those of you who like to tinker in the kitchen to cheer yourselves up, then lets take some time out of our busy schedules to whip up this simple but rewarding recipe.

Lemon Curd
  • 3 lemons
  • 1 1/2 cup caster sugar
  • 120g unsalted butter, room temperature
  • 5 egg yolks
  • Salt
  1. Zest the lemons and whizz the zest and sugar in a food processor until the mixed thoroughly
  2. Transfer the sugar and lemon to your mixing bowl and beat in the butter until light and fluffy
  3. Beat in the egg yolks until combined
  4. Now transfer the mixture into a saucepan and heat over a small flame, stirring frequently for 20 minutes. The mixture should thicken gradually, but don't turn the heat up to hurry the process as this will scramble the egg yolks and you'll end up with a rough curd
  5. Remove the curd from the flame, and cool to room temperature before transferring the curd into a jar to refrigerate

Friday

Warning: Highly Addictive Oven Chips


I remember my uni days in Bristol, especially on those cold nights when I couldn't be bovvered to put sensible walking shoes on and step outside onto the icy pathways, where I would delve into my cheat pack of frozen oven chips... which I would proceed to cover in home made sesame oil (I had a Korean housemate whose mother shipped this stuff to him by the crate!), rosemary, salt and pepper then coat them completely in Heinz ketchup when they were ready. Let this not fool you: it wasn't the chips I craved, it was the ketchup. Weird, eh?

Anyway, since I've been back in Malaysia, I hardly ever eat home made chips anymore. This is probably because food is almost always prepared when I get home, or chips are so cheap and readily available from everywhere. The difference is: they're always shoestring fries. Me no likey.

So last month when my parents decided to throw a barbecue, I decided to prepare the carbs and instead of frozen oven chips I'd do it right. Now that I am older and wiser... LOL right.

Easy & Highly Addictive Oven Chips
  • 2 large russet potatoes, scrubbed and cut lengthwise into 1/2 inch sticks/wedges
  • 2 large sweet potatoes, same as above
  • 2 tbsp olive oil
  • 3 tbsp fresh rosemary leaves
  • A sprig of spring onions, chopped
  • 2 cloves garlic, crushed
  • 1 tsp chicken stock cube, dissolved in hot water
  • Black pepper
  1. Preheat oven to 200C
  2. Soak the potato wedges in a large bowl of hot water for 10 minutes, drain the potatoes then pat them dry
  3. Put the potatoes back into the bowl and toss them in olive oil, rosemary, spring onions, garlic, chicken stock, and pepper
  4. Arrange the potatoes in a single layer on a baking tray, cover lightly with a piece of foil and pop in the oven for up to 5 minutes (the foil will trap the moisture in)
  5. Remove the foil, then continue to bake for another 20 minutes or until they're a nice golden brown, then flip the potatoes with a spatula and continue to bake for another 10 minutes on the other side
  6. Serve hot with an extra sprinkling of sea salt and/or pepper
I'm babysitting my siblings this weekend as my parents will be out of town, so I'm definitely going to prepare this dish with a side of grilled chicken breasts or something. Who cares, this goes with everything! lol

Easy peasy recipe, and I guarantee that you won't go back to frozen oven chips once you've tasted this.

Have a good weekend, friends, much love from the Happy Hufflepuff x

Tuesday

Quiche me!


I haven't updated in ages! I don't even know where the time has gone since my last post, what was it... a month ago! Yonks! I don't know why I'm shouting everything in my head, nor do I know why I started saying "yonks" today. It's like one of those things you do ironically, then it just becomes a bloody embarrassing habit you can't kick.

Totes. That's another one that stuck on me.


Quiche is the other thing. I never used to eat quiche, but lately it seems like the only thing I order when I go out to eat! There we go, there's another exclamation point. But, seriously, how did I not love quiche until recently?

I've been saving this recipe in my bank for a while now, mostly as I've been far too caught up with being a functional and social human being that I haven't had time to just sit at my desk and type this post up. LIES! I've been scrolling down my T dash for days on end and can't seem to tear myself away. That, my friends, is the ugly truth.


Let's quit with the crazy (as if) and get to the recipe:

Roasted Peppers, Eggplant, and Fennel Quiche
  • Ready-to-roll puff pastry (*gasp* ready to roll? Whatever, ain't nobody got time for dat)
  • 1 cup grated parmesan cheese 
  • 1 red pepper, sliced
  • 1 yellow pepper, sliced
  • 2 medium sized eggplants, sliced
  • 2 cloves garlic, crushed
  • Olive oil
  • Red wine vinegar
  • Salt & pepper
  • 1 fennel bulb, sliced
  • Butter
  • 3 large eggs
  • 150ml milk
  • 4 tbsp double cream
  • 1 cup sliced cherry tomatoes
  1. Follow the instructions for the pastry, and roll into a prepared pie dish
  2. Brush with melted butter, then cover the base with shredded cheese (you can use any cheese, I just happened to have Parm on hand that day though I prefer stronger cheeses)
  3. Preheat the oven to 180C, toss the sliced peppers, eggplants, and garlic into a baking tray and coat with olive oil, red wine vinegar, salt and pepper. Roast the vegetables for roughly 15 minutes in the oven, or until the aroma fills your belly with rumbling hunger
  4. While waiting for the other vegetables to cook, cook the sliced fennel in a knob of butter and olive oil until soft. Season with salt and pepper to taste as you cook. 
  5. When all the vegetables are ready, just mix them up together and layer into the waiting crust over the cheese, and add tomatoes
  6. Then in a medium sized bowl, whisk the eggs, milk, and double cream to create the custard. Pour this mixture over the vegetables, and cover with more cheese
  7. Pop into the oven and bake for 180C/fan for 30 minutes or until the custard has set. Cool on a wire rack and serve with fresh lettuce and a balsamic glaze dressing

Much love, and I'll try to be more disciplined with the posts! 
xx Nabs

Monday

Garlic Tomato Pizza Sauce

I am not one of those homecooked, organic food snobs, however I do enjoy taking the time to whip up fresh food from scratch when I have the time. Nigella calls it her Italian Mamma mode, which I would love to adopt, but have no Italian blood in my my heritage... so I'll need to come up with something while I knead my bread dough next. 
As I have recently finally found a choice recipe for making my own pizza crust, I needed to experiment on making my own pizza sauce! I prefer heavily tomatoey sauces, have always leaned towards marinara sauce as my favourite, and thought... if it works on my pasta, it should definitely work on my pizza. 
This is a ridiculously easy pizza sauce to whip up, you should have all the ingredients stocked in your pantry already, but even if you don't it's no trouble adapting it to what you do have... or just running into the store for 5 minutes to grab the stuff. You don't even need a basket to carry the ingredients! 
Let's get to it: 
Super Easy Garlic Tomato Pizza Sauce 
  • 1 14oz can diced tomatoes, no salt added
  • 1 tbsp olive oil
  • Handful fresh basil leaves (you can use dried basil)
  • Handful oregano (I used dried, you may use fresh)
  • 1 tsp (or less) dried chili flakes
  • Pinch sea salt
  • Crushed black pepper
Mix all the ingredients in a medium sized saucepan and bring to a boil, once it starts to bubble, lower the heat to a simmer and cook for 15-20 minutes. When the flavours have all blended (be sure to season to taste), transfer the mixture to a food processor and whiz for about 1 minute or less, just to get all the big chunks down. You want it smooth, but not too smooth, ya know?
This amount of sauce is good enough for a moderate layer on 4 medium sized pizzas (so double this pizza crust recipe), and will go with most savoury toppings. For Sunday lunch with the family, I made a vegetarian pizza and a pepperoni pizza. With a layer of sauce over olive oiled crust, shaved mozzarella, slices of pepperoni, zucchini, eggplant, and then more mozzarella... my brothers loved it! 
I'm actually quite surprised at how easy pizza is to make from scratch, and now that I know this... I can't wait to recreate some of my favourite salads as pizzas. 

Saturday

Sweet & Savoury Pizza

The first time we attempted to make pizza dough was a bit of a mess... Al and I had neglected to read the whole recipe and used the wrong type of yeast. We just sorta... rolled with it (gettit?). Yikes. So, as I had a bit of free time this week, I thought I'd give it another shot. This time, I made sure I had all the ingredients needed and read it word for word, and all the comments, and various other recipes to cross check if it would work.

This recipe for the pizza dough is incredibly simple, it only takes an hour minimum to rise, but you can keep it overnight if you would prefer a lighter, softer crust. I usually like my pizza crust a little on the crispy side, but as it was far too late for pizza when I made the dough last night, I decided to let is rest and have it today instead.

My family's always been a bit torn when it comes to pizza topping, as my dad likes the spicy stuff, mum prefers the hawaiian, and my siblings are all over the topping chart. I do think that I'm the only one in the house who appreciates vegetarian pizzas, so today I was on a mission to civilize. I wanted to highlight the freshness of the ingredients, the mix and play of flavours, and just really... to let the fresh toppings speak for themselves. No sauce was prepared for these mini pizzas, and instead I just slathered on various cheeses.
Let's not waste anymore of your time, as you'll be knead-ing (heh) it while you wait for the dough to rise before dinner time.

Easy Peasy Crispy Pizza Crust
Courtesy of thekitchn.com
  • 1 tsp active dry yeast
  • 3/4 cup warm water
  • 2 cups all purpose flour
  • 1 tsp sea salt
  1. In a large heavy mixing bowl, pour the lukewarm water over the yeast and let it sit untouched for around 10 minutes. Then stir with a wooden spoon to dissolve the yeast
  2. Add the flour and salt, then combine with the spoon until you get a messy-ish, but dry (as in doesn't stick to your fingers to create a webbed look) dough
  3. Turn the dough onto a lightly floured surface and knead it gently for around 5 minutes. Pop the dough back into the bowl and cover it with a clean, damp cloth to let it rest and rise for a minimum of 1 hour
  4. If you're not using the dough immediately, then just put it into a ziploc bag, or wrap in clingwrap, then just leave it in the fridge for up to 3 days. Before using, be sure to take it out and let it sit on the counter for at least 30 minutes
  5. When ready to bake, preheat the oven to 200C/fan, cover a baking sheet with parchment paper and sprinkle a tsp or less of semolina onto the paper then with your lightly floured hands, spread the dough out using your fingertips into the desired shape and thickness
  6. Drizzle with olive oil, and then pop your toppings on. Bake for 15 minutes or until the crust is golden
I'll also share the two toppings I prepared today with you here, but really I just don't wanna forget what I put on so I can recreate them soon.

Pear and Gorgonzola Pizza
  • 1/2 golden pear, peeled and sliced thinly
  • Gorgonzola cheese
  • Light mozzarella, sliced
  • Salt and pepper
  • Fresh rocket leaves
  • Balsamic glaze
Spread the Gorgonzola over the top of the crust, then place the mozzarella slices where you want them. Cover with the pear slices, season and bake for 15 minutes. When done, garnish with a handful of rocket and a drizzle of balsamic glaze.

Caprese Pizza
  • Salt and pepper
  • 1 clove garlic, minced
  • Parmesan cheese
  • Mozzarella cheese, sliced
  • 1 fresh tomato, sliced
  • Fresh basil
  • Balsamic glaze
Drizzle olive oil over the crust, then season with salt and pepper, then rub the garlic over the entire crust. Sprinkle the parmesan cheese, then place the mozzarella slices where you want them, and top with the tomato slices. Go ahead and twist some more black pepper on there if you are so inclined. Bake for 15 minutes, then top with balsamic glaze and fresh basil. 

The pizza crust turned out great, though next time I'm not gonna make it so far ahead as I prefer a crispier base. The toppings were fresh, ingredients tasted beautiful, and it was just enough for an early dinner. I even got my brother to eat the pear pizza! Shocker!

Now that I know how easy it is to make my own pizza, I'm definitely going to have a lot of fun coming up with different toppings for my lunch and dinners. Who knows? Maybe I'll pack some dough and we can make fresh pizza over lunch?

Lots of love, Nabs