Showing posts with label pear. Show all posts

Tuesday

Pear and Almond Tart


I went on a ski trip to Switzerland in February, as an extra adult helping hand for my brother's school trip (lol any excuse for a holiday, really) as well as to learn how to ski. First time, and boy oh boy, it was terrifying as heck on the first two days! It simply goes against every natural instinct in my body to set myself off a perfectly stable perch onto the slippery piste with low visibility! Who does that? Seriously!
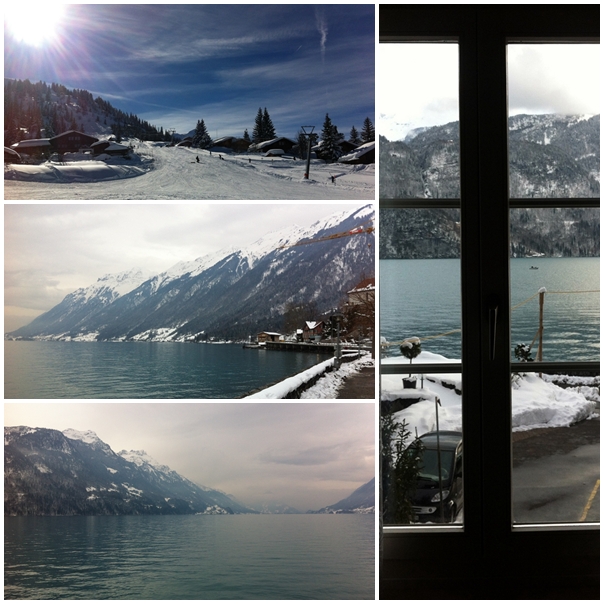

However, as uncomfortable as the damned ski boots were, and the biting cold on our cheeks, and the low visibility, and the crashing into powder snow (or fat snow as my brother likes to call it) was, by the end of the 6-day ski trip, I was skiing and managing my turns, and hurtling down the flat planes (except for one or two bits where I need a sixth-former's help to pull me along on his snowboard). It was so amazing, and I'm raring to go on another ski trip to learn more and pick up a bit more confidence in the process. 

It's really something to see little toddlers in their one-piece snow suits whizzing past you on the piste while your knees shake to maintain a snowplough turn cos you're terrified of the powder snow. Those little Swiss kids got me every time, with their mittens and goggles and helmets and lisping German! Goddammit, gotta stop these maternal feelings, I'm too young to feel this way. 

Anyway, let's get back to the food bit: there was one afternoon where I just could not ski anymore. It was the second day, and I'd chosen ill-fitting boots (too tight) paired with too short socks (ouch! Still have the scar from a pressure point). So after a morning of wincing and hobbling and trying not to be the big adult baby crying in a group of year 7 kids, I opted out and sat in a cafe up in the Brienz Axalps Ski Resort. Coffee, a piece of pear cake (I couldn't understand the menu so asked the proprietor what his favourite dessert was) topped with freshly whipped cream, and then followed by a glass of mulled spiced wine. 


That piece of pear cake was one of the most beautiful things I have ever tasted! I have wanted to recreate it since I had my first bite, but due to time constraints, I had to put it off until last weekend when I allocated a completely Nothing weekend just so I could bake and rest. Also, let's be honest: I got distracted by other recipes.


So this is my first attempt at a pear cake like that one I had in Switzerland. It's close, but no cigar, so you can bet your bottom dollar I'll be trying again and again til I get it just right. 


First, we prepare the shortbread crust! This, my friends, is the reason I bought this food processor, so that I may make shortcrust pastry without warming the dough with my hands.

Pastry:
  • 200g flour
  • 2 tbsp caster sugar
  • 100g cold butter, cut into cubes
  • Salt
  • 3 tbsp ice cold water
  1. Preheat the oven to 200°C and grease a tart pan
  2. Pop the flour, sugar, butter, and salt into the food processor and pulse until mixture resembles coarse crumbs. Add the 3 tbsp water and pulse again until it begins to look like bits are coming together
  3. Transfer to a baking sheet, form into a ball, flatten into a disc with a rolling pin (in between two pieces of baking paper) then leave it there for 30-60 minutes
  4. When ready to mold, roll the pastry flatter and turn it into the prepared pastry tin. Prick and bake for 15 minutes

Almond Cream
  • 100g butter, softened
  • 100g sugar
  • 2 eggs
  • 1 tsp vanilla extract
  • 100g ground almonds
  • 2 tbsp flour
  1. Preheat the oven to 190°C
  2. Beat the butter and sugar until combined, then beat the eggs and vanilla in one at a time
  3. Fold the almonds and flour into the butter mixture, then spread the cream into the prepared pastry crust
  4. Peel and core about 3-4 ripe brown pears, then slice and arrange on top of the cream
  5. Bake for 20-30 minutes

Serve warm, with a scoop of vanilla ice cream if you have any on hand, or a dollop of freshly whipped cream. Yum!

It's a good recipe, close to what I had in Switzerland, unfortunately it's not quite it. The cake I had in Switzerland had a thinner, more flaky base, and was slightly more tart. I'll try this one again soon!

Saturday

Sweet & Savoury Pizza

The first time we attempted to make pizza dough was a bit of a mess... Al and I had neglected to read the whole recipe and used the wrong type of yeast. We just sorta... rolled with it (gettit?). Yikes. So, as I had a bit of free time this week, I thought I'd give it another shot. This time, I made sure I had all the ingredients needed and read it word for word, and all the comments, and various other recipes to cross check if it would work.

This recipe for the pizza dough is incredibly simple, it only takes an hour minimum to rise, but you can keep it overnight if you would prefer a lighter, softer crust. I usually like my pizza crust a little on the crispy side, but as it was far too late for pizza when I made the dough last night, I decided to let is rest and have it today instead.

My family's always been a bit torn when it comes to pizza topping, as my dad likes the spicy stuff, mum prefers the hawaiian, and my siblings are all over the topping chart. I do think that I'm the only one in the house who appreciates vegetarian pizzas, so today I was on a mission to civilize. I wanted to highlight the freshness of the ingredients, the mix and play of flavours, and just really... to let the fresh toppings speak for themselves. No sauce was prepared for these mini pizzas, and instead I just slathered on various cheeses.
Let's not waste anymore of your time, as you'll be knead-ing (heh) it while you wait for the dough to rise before dinner time.

Easy Peasy Crispy Pizza Crust
Courtesy of thekitchn.com
  • 1 tsp active dry yeast
  • 3/4 cup warm water
  • 2 cups all purpose flour
  • 1 tsp sea salt
  1. In a large heavy mixing bowl, pour the lukewarm water over the yeast and let it sit untouched for around 10 minutes. Then stir with a wooden spoon to dissolve the yeast
  2. Add the flour and salt, then combine with the spoon until you get a messy-ish, but dry (as in doesn't stick to your fingers to create a webbed look) dough
  3. Turn the dough onto a lightly floured surface and knead it gently for around 5 minutes. Pop the dough back into the bowl and cover it with a clean, damp cloth to let it rest and rise for a minimum of 1 hour
  4. If you're not using the dough immediately, then just put it into a ziploc bag, or wrap in clingwrap, then just leave it in the fridge for up to 3 days. Before using, be sure to take it out and let it sit on the counter for at least 30 minutes
  5. When ready to bake, preheat the oven to 200C/fan, cover a baking sheet with parchment paper and sprinkle a tsp or less of semolina onto the paper then with your lightly floured hands, spread the dough out using your fingertips into the desired shape and thickness
  6. Drizzle with olive oil, and then pop your toppings on. Bake for 15 minutes or until the crust is golden
I'll also share the two toppings I prepared today with you here, but really I just don't wanna forget what I put on so I can recreate them soon.

Pear and Gorgonzola Pizza
  • 1/2 golden pear, peeled and sliced thinly
  • Gorgonzola cheese
  • Light mozzarella, sliced
  • Salt and pepper
  • Fresh rocket leaves
  • Balsamic glaze
Spread the Gorgonzola over the top of the crust, then place the mozzarella slices where you want them. Cover with the pear slices, season and bake for 15 minutes. When done, garnish with a handful of rocket and a drizzle of balsamic glaze.

Caprese Pizza
  • Salt and pepper
  • 1 clove garlic, minced
  • Parmesan cheese
  • Mozzarella cheese, sliced
  • 1 fresh tomato, sliced
  • Fresh basil
  • Balsamic glaze
Drizzle olive oil over the crust, then season with salt and pepper, then rub the garlic over the entire crust. Sprinkle the parmesan cheese, then place the mozzarella slices where you want them, and top with the tomato slices. Go ahead and twist some more black pepper on there if you are so inclined. Bake for 15 minutes, then top with balsamic glaze and fresh basil. 

The pizza crust turned out great, though next time I'm not gonna make it so far ahead as I prefer a crispier base. The toppings were fresh, ingredients tasted beautiful, and it was just enough for an early dinner. I even got my brother to eat the pear pizza! Shocker!

Now that I know how easy it is to make my own pizza, I'm definitely going to have a lot of fun coming up with different toppings for my lunch and dinners. Who knows? Maybe I'll pack some dough and we can make fresh pizza over lunch?

Lots of love, Nabs

Tuesday

Pear & Hummingbird Cake

I've been craving pears and oranges lately, just slices of cold fruit on the hot days while the renovation works go on around me. Sometimes I pair them with an ice-cold glass of fresh lemonade or pineapple flavoured water, and my parents would join me on the patio while we discuss interior decor and the technical aspects of raising a roof.
So to nobody's surprise, our bottom refrigerator shelf is filled with fruit that's starting to bruise! I've got an abundance of pears, and I'm not entirely sure what I should do with them. There are pies, tarts, cakes, muffins, pizzas, etc... yet I have no time. 
Last night, while watching Grey's Anatomy reruns, I decided to just quickly whip up a really easy (yes satisfying) cake for my mum to serve to friends who might drop by for their morning coffees or high tea. Also, I kinda need to clear out those pears. I paired up (heh) a pear and a Hummingbird Cake, recipe from the Hummingbird Bakery cookbook, a recipe I've tried before while yielded amazing results. Only it didn't look so pretty, so I couldn't bear to share any of those pictures here. Call it vanity, if you must. 
So here's my take on the Hummingbird Cake with Pears: 
Pear & Hummingbird Cake
Adapted from the Hummingbird Bakery cookbook
  • 300g caster sugar
  • 3 large eggs
  • 300ml sunflower oil
  • 3 large ripe bananas, mashed
  • 1 tsp ground cinnamon
  • 300g self raising flour
  • 1/2 tsp vanilla extract
  • 100g tinned pineapple, chopped
  • 100g shelled pecans, chopped
  • 1 golden pear, chopped, plus slices to decorate
  1. Preheat the oven to 180C and line a 9 inch round baking tin with butter and parchment paper
  2. In a large mixing bowl, combine the sugar, eggs, oil, mashed bananas, and cinnamon and beat until incorporated
  3. Beat in the flour and vanilla, mixing until just combined
  4. Then beat in the pineapple, pecans and pear bits
  5. Line the bottom of the baking tin with the pear slices, arrange as you like, then pour the cake batter over. Smooth the top and pop it in the oven for 40 minutes, or until a skewer poked through at an angle comes out clean
  6. Allow the cake to cool in the tin for 15 minutes, then turn it over onto a wire cooling rack. Cool completely before removing onto your cake plate, dust with ground cinnamon before serving
I left it overnight on the counter last night, wrapped in a clean cloth to keep it sanitary. This morning, before heading out to work, I dusted it with cinnamon, cut myself a slice and had it for a very decadent breakfast. I've decided to forgo the cream-cheese frosting which is customarily served with the cake, however if you want to, use this recipe and cover the cake as you like with the frosting. I'd just like to tell you that the amazing flavours of the actual cake are likely to be overpowered by the frosting should you choose to do so. Also, you won't be able to have it for breakfast (guilt-free). 
To each his own, and I really do hope you give this recipe a shot as it's so bloody amazing. 
Lots of love, happy weekday, 
Nabs