Showing posts with label lunch. Show all posts

Wednesday

Greek Chicken and Tabouleh Meal Prep


If you follow me on Instagram, you'll notice I'm skipping weeks a bit and have gone from week 1 to week 3. This is because I'm not entirely pleased with how week 2's Korean Beef bowls turned out and I need to tweak the recipe a bit before sharing. 

This one, though, this is a really good one! There are a LOT of components and ingredients but when you actually get down to it, it's really quick and easy to prepare. I also love the lightness and freshness of the whole dish, and the flavours are bright and hits all the high notes. 

I'm definitely going to add this to the rotation for my lunch meal preps, along with the last recipe I shared on Chipotle Chicken. 

Greek Chicken Tabouleh Bowls
Yield: 4 servings 
Time to cook and prepare: 1 hour
Step 1: Prep and Cook the Chicken
Ingredients:
  • 4 boneless skinless chicken breasts
  • 1 tbsp extra virgin olive oil
  • 1 tsp dried oregano
  • 1/2 tsp dried thyme
  • 1/2 tsp dried basil
  • 1/2 tsp onion powder
  • 1/2 tsp garlic powder
  • 1 tsp salt
  1. Combine all ingredients and rub into chicken breasts
  2. Arrange on a foil covered baking tray and cook in a preheated oven at 180°C for 20-25 minutes (depending on the size of the chicken)
  3. Remove from the oven and allow to rest/cool slightly before slicing into them to assemble

Step 2: Assemble the tabouleh
  • 1 bag of cauliflower rice
  • 1/2 medium cucumber, diced
  • 2 medium Roma tomatoes, deseeded and diced
  • 1 1/2 cups parsley, chopped
  • 1/4 cup mint leaves, chopped
  • 2 green onions, white and pale parts only, thinly sliced
  • 1 garlic clove, minced (I use a garlic crusher)
  • 2 tbsp extra virgin olive oil
  • 1/4 tsp lemon zest
  • 2 tbsp fresh lemon
  • 1/4 tsp chili flakes
  • Season to taste
  1. Mix everything together in a large bowl
Step 3: Make the Tzatziki 
  • 1 cucumber, peeled and grated
  • 1 cup plain Greek yoghurt
  • 2 large garlic cloves, minced (again, the crusher)
  • 1 tbsp white vinegar
  • 1/2 tsp salt
  • 1 tbsp dill (I had to use dried as the supermarket was out of fresh)
  1. Combine all ingredients and resist the temptation to eat it all with a bag of crisps! 
Step 4: Assemble!

Tuesday

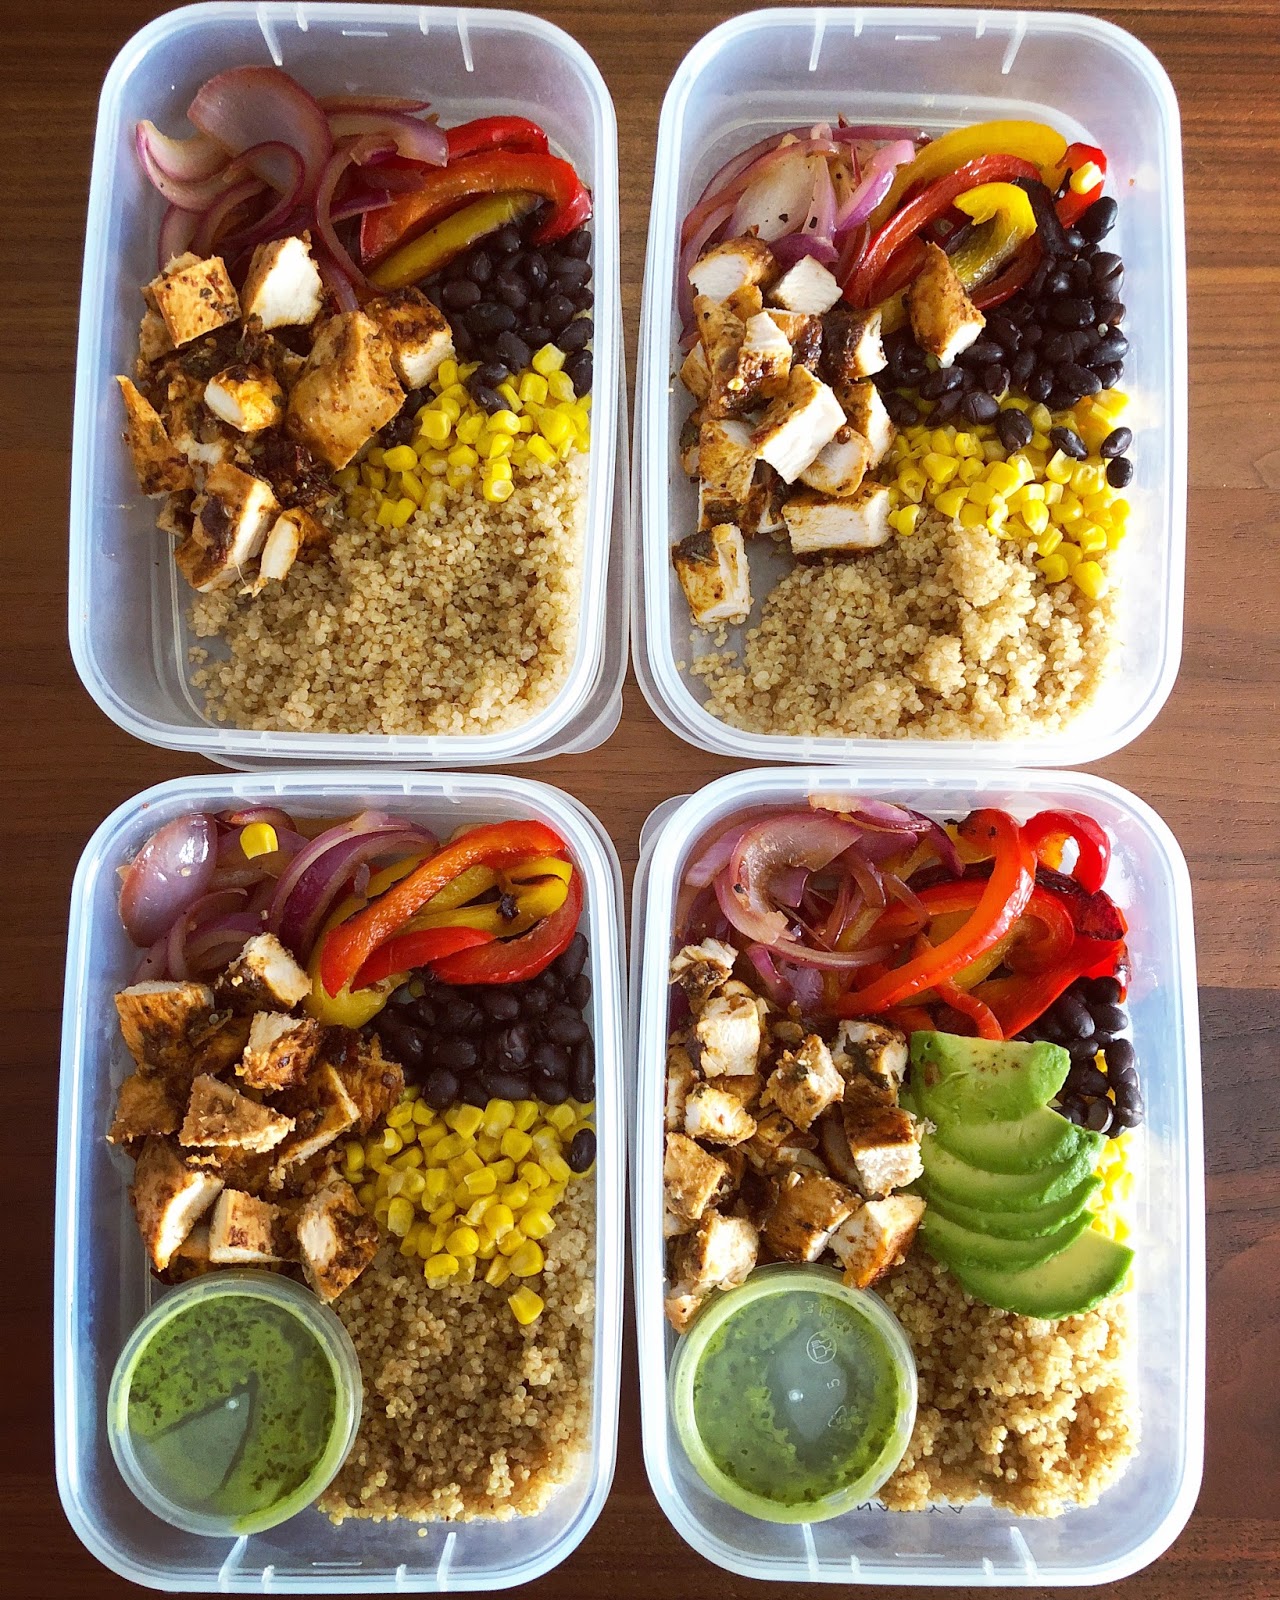
Cravings for Chipotle


I made a huge mistake when I went to the States for work last year - I went to a Chipotle Mexican Grill branch for lunch. I remember suffering from a particularly awful bout of jetlag, was close to being sick at one point but I just needed some food inside my belly before I went back to my hotel room and passed out. There was a Chipotle just around the corner from where I was staying in SF, and I walked over... and boy oh boy, despite how I felt, I finished everything!

Now here's why it was a mistake: I live in Malaysia - all the way on the other side of the world from a Chipotle... the only thing close to this here is Chili's, and well... come on, it just doesn't compare. So what's a girl to do but try to recreate some of their recipes?

Lucky for me, there's no shortage of helpful recipe hackers on Pinterest and I pulled together various recipes to form what is fast becoming one of my favourite meals of all time. Also, this is definitely one of my top 3 recipes for chicken!


Pollo en Adobo with Cilantro Lime Quinoa and Cilantro Lime vinaigrette
I don't know which one of these 3 components I love most! I lie, it's the chook. 

The Chicken:
  • 4 - 6 boneless, skinless chicken breasts
  • Juice of half a lime
  • a handful of fresh cilantro leaves, chopped
  • 2 chipotle peppers in adobo, minced (use a fork!)
  • Fajita seasoning*
  • 1/4 cup olive oil
  1. Slice the chicken breasts in half across so you get thinner strips and they cook faster
  2. Mix the lime juice, cilantro, chipotle peppers, fajita seasoning and olive oil and marinade the chicken for about an hour
  3. Preheat the oven at 180°C, then cook your chicken breasts on a foil covered baking tray for about 15 minutes
  4. Remove from heat, allow to rest before slicing into chunks to serve
The Quinoa (you can easily substitute this for rice):
  • 1 cup quinoa/rice
  • 2 cups water (adjust according to rice - see notes below)
  • Juice of 1 lime
  • 1 tsp lemon juice
  • 1 tsp salt
  • 1 tbsp fresh cilantro
  1. Cook the quinoa or rice in the water, with salt and the juices from the lime and lemon
  2. Once cooked, fluff up and stir in your chopped cilantro
The Cilantro Lime Vinaigrette (pictured above)
  • 1/3 cup olive oil
  • 2 tbsp water
  • 2 handfuls cilantro
  • Juice of 2 limes (or 1/2 a lemon if you prefer)
  • 2 cloves garlic, diced
  • 1/4 tsp salt
  • 1 tsp honey
  • 2 tbsp red wine vinegar
Blend it all together with an immersion blender and pour over the rice and chicken

For my meal prepped lunches, I also sauteed some red onions and green and red peppers, throw in some toasted tinned corn kernels and rinsed black beans (also from a tin). I can't for the life of me remember what I put in the peppers and onions, but both were quite basic and I tend to use an olive oil and butter base with some chili powder, salt and pepper. Sorry! Will update if I find my notes!

*Fajita seasoning: you can use the pre-packed stuff, which I do in a pinch, or save some money and make your own batch as below:
1 tbsp each of:
  • Chili powder
  • Ground cumin
  • Ground oregano
  • Smoked paprika
  • Onion powder
  • Garlic powder
  • Cayenne pepper
  • 1/2 tbsp each of salt and pepper
Notes for rice:
There are 3 main types of rice (that are most common in home cooking) - long grain (like Basmathi and Jasmine rice), short grain (usually like sushi rice, arborio, Thai sticky rice, etc) and brown rice (it's ... brown). When cooking your rice, your ratio of water to rice and cooking times will vary depending on which type you're going with.
First tip - read the package for instructions. Usually can't go wrong there.
If there are no instructions, I tend to go with the following ratios and cooking times:
  • Long-grain rice: 1 cup rice:2 cups water; I usually cook it for 15 minutes covered on low after the initial boil
  • Short-grain rice: 1 cup rice:1 cup+2 tbsp water; cook covered and bring to a boil, then lower the heat and cook for another 5 minutes. THEN leave it covered off the heat for 10 minutes - DON'T PEEK
  • Brown rice (long-grain): 1 cup rice:2 cups water; bring to boil, then reduce heat to a very low simmer and cover and cook for 45 minutes. Take the rice off the heat and let it continue to cook in its own steam for another 10 minutes
I shall, of course, caveat this by saying... I'm no expert rice maker and it's touch and go for me most times! 

If you have a rice cooker, well bully for you! I have yet to get one despite living in this house for 2 years and being Asian. This really is due to the fact that my kitchen is tiny and I only have 2 power points - don't ask me, my theory is the people who designed this apartment building don't cook. 

Looking forward to moving into our new place and having a kitchen to be my very own playground!

Wednesday

Tomatoes, mozzarella and toast!


I've been seeing a lot of pictures of tomatoes on burrata on Instagram and Pinterest lately, and I'm not sure if it's just having a revival at the moment or the interwebz is reading me again. But after days and days of seeing variations of these flavours every time I check my social media, I had to have it.

Only problem is, I couldn't find burrata anywhere! Dagnabbit! This wasn't going to deter me, though, so mozzarella it is!

Here's a recipe I love to make for my husband and I when we can't decide what to have for dinner, or for a weekend lunch.

Braised tomatoes on mozzarella with toast 
(serves 2)
  • A healthy glug of olive oil
  • 2 pints cherry tomatoes
  • A fistful of roughly chopped basil
  • 4-5 smashed cloves of garlic
  • A pinch of sea salt
  • 2 balls of mozzarella
  • Crusty toast 
  1. Heat the olive oil in a braiser or pan, doesn't have to be fancy, add the tomatoes, basil, garlic and sea salt, cover and simmer on low-medium heat for 20 minutes. 
  2. Uncover, pop in the oven under the broiler on medium heat for about 5 minutes
  3. Remove from the oven, and pour over the mozzarella (or even better if you have burrata!) in a bowl and serve warm with toast 

Easy peasy, and super satisfying!

Sunday

Moroccan meatballs with lemony couscous


I was down with a really bad fever over the weekend, caused by a raw and inflamed throat. I traced it back to having had extremely hot soup, at which point I had scalded my throat and caused this stupid thing. My throat's still quite raw, but not as bad as it was on Friday. So since I was feeling slightly more human today, I thought to make dinner for R and myself as a thank you of sorts for taking care of me over the past few days.


I need to start planning my photography better... especially with a hungry husband around, rushing me to eat and thus taking away my styling time. That's not entirely fair, I've also just really fallen out of practice and have gotten lazy. I assure you though, the recipe may be simple, the photos may be crap, but the food is good!

Moroccan Meatballs with Lemony Couscous
Serves: 2
Meatballs
  • 500g minced lamb (or beef)
  • 1/2 red onion, chopped 
  • 1 garlic clove, crushed
  • 1cm root ginger, grated
  • Pinch of dried chilli flakes
  • 1 tsp cumin
  • 1 tsp ground cinnamon
  • Olive oil
  • 1 tin (400g) diced tomatoes
  • 100ml chicken stock
  • 1/2 bunch coriander, chopped
Couscous
  • 100g couscous
  • 25g butter
  • 175ml chicken stock, boiling
  • 1/2 bunch coriander, chopped
  • Juice of half a lemon
  • Crumbled feta (optional)
  1. Combine the minced lamb, onion, half of the garlic, half of the ginger and half of the spices in a medium sized bowl, season lightly and mix with your hands (clean, of course), then form the mix into small meatballs
  2. Heat the olive oil in a large, nonstick pan, add the meatballs and cook in batches until they're all nice and browned all around. Remove from the pan and add the remaining crushed garlic, ginger and spices and cook in the oil and meat juices for a while. 
  3. Add the tinned tomato (with the liquid) and chicken stock to the pan and allow to simmer for 10 minutes, then add the meatballs back in and cook for 20 minutes. Season well. 
  4. Place the couscous and butter in a small-medium heatproof bowl, pour the boiling chicken stock and lemon juice then cover the bowl with clingwrap and leave for 10 minutes. Fluff the couscous with a fork, stir the coriander and feta through and serve with the mealtballs.

Friday

Hummus Co's Smoky Chipotle Hummus & Baba Ganoush


It looks like everyone's hopping onto the clean eating initiative these days; everywhere I turn I see "clean" menus, friends on the raw food diet, aunts cutting out all processed foods and ingredients, etc. So with Alena and me on our healthy kick, we've been looking up new recipes and any places in town that would help us sustain this diet. Three weeks in and we've been doing very well, I think!

Some friends of ours from work, Fariz and Aneesha, asked me last week if I'd like to try hummus and baba ghanoush by Hummus Co, a new home made gourmet food producer (company?) in KL. Hummus Co is a brand new company started in December of last year, and they're currently in the process of putting their name and product out there in the market, so since I'm doing this Happiness Initiative anyway, why not share the happiness?

Fariz and Aneesha gave me two sample pots last week, and I've stored them in the office fridge to pair with my packed lunches. But for baba ghanoush, I felt like I needed to do something special! Today, I'll share a recipe for Greek Meatballs that I found somewhere ages ago but never got around to trying (I really can't recall where I found this recipe, so if any reader knows it and could kindly point me to a link to credit, I'd really appreciate it).
 

Greek Meatballs
Yield: 16 1 inch sized balls

  • 0.5 kg ground lamb
  • 1 clove garlic
  • 1 1/2 tbsp mint, chopped
  • 1 tbsp flat leaf parsley, chopped
  • Zest of 1 lemon
  • 1/2 tsp ground cinnamon
  • 1/2 tsp oregano
  • Salt and pepper
  • 1 egg
  • 1/4 cup dried apricots, chopped
Preheat the oven to 180C, combine all ingredients in a bowl, then shape into balls of around 1 inch in diameter and line them up on a lightly greased baking tray. Bake for 20-22 minutes.

I was going to have an open faced sandwich with baba ghanoush and meatballs, but that all went out the window and I ended up just slathering the delicious eggplanty goodness of baba ghanoush onto the meatballs. The flavour combination was fantastic, and I just kinda wish the sample pot of baba ghanoush was like... 4 times the amount LOL.

I've been experimenting with different types of hummus myself, but haven't strayed far from the basic recipe, so this Smoky Chipotle hummus was a very nice surprise! It was smoky, true to it's name lol, and had just the right amount of heat in each bite. I had this hummus on a slice of good grain bread, with some slices of store bought (probably processed) smoked turkey meat, rocket and lettuce. Amazing, and totally hit the spot for workday lunches.


Anyway, I personally don't mind making my own hummus, but there have been days when I've been too lazy and end up not simply because I don't like the hummus that we can get at the supermarkets in town. Now that I've found Hummus Co, I know where I can go to stock up my office fridge lol. Looking forward to trying out their different flavours.

According to their FB, they have the following flavours:
1. Signature Hummus
2. Tangy Jalapeno Hummus
3. Smoky Chipotle Hummus
4. Greek Olive Hummus (OMG I want to try this one!)
5. Classic Pesto Hummus
6. Rich Sun Dried Tomato Hummus

Check out their facebook page for more information. You can place orders by emailing them at hummusco@gmail.com, for a minimum order of 250g. Unfortunately for a big bulk of my readers, you can only order if you live in Malaysia, preferably in KL as you'll have to pick your order up at their HQ.

They also post up some nifty healthy recipes and options for their products. They have a Mediterranean burger recipe that I've got my eye on. Anyone wanna do a barbecue at my place now that the rainy season has let up?

xx Nabs

P.S. I apologize for the crap iPhone pictures, but I'm definitely going to make these meatballs again over the weekend... might update this depending on how bovvered I am lol.

Saturday

Quick and tasty lunch option

Photobucket
There's a bakery in town called The Bread Shop where they serve one of the best lemon tarts I have ever had. Something else they also have on the menu is healthy and light lunch options! We went there for a quick lunch yesterday, and I ordered this amazing tomato and cheese on toast that they have. It was so good, and such a filling lunch, too, that I got cravings for it when I woke up today.

It's a good thing I also bought a load of their "broom bread", which is basically super high fibre bread, to attempt to recreate the lunch I had yesterday! Easy enough, though probably not as aesthetically pleasant as theirs was... I realize now that I should have probably used room temperature sliced cheese, as opposed to pre-grated cheese straight from the fridge.

Anyway, give it a shot, it's good for breakfast, lunch, or even a snack.

2 slices of tomato (per bread)
Cheese of choice (I used grated gruyere, to cover the top)
Thick slice of good bakery bread

Preheat the oven to 200C, assemble the ingredients for the open faced sandwich on a baking sheet, bake for 7-9 minutes. Serve warm.

Cheers!
x Nabs