Showing posts with label tiered. Show all posts

Wednesday

Three Years with Ellebug, or The Happy Hufflepuff


I went to nine schools throughout my academic career, moved houses 13 times, I work at one of the Big 4 accounting firms as a management consultant (which, besides having an incredibly high employee turnover, the nature of our jobs is that we do short term projects). Permanence is not a concept I am familiar with. So to be celebrating my third year of baking and writing this blog is kind of a B.F.D.

The past three years have seen quite a lot of changes in my life, my baking, and my work. I like to think I've grown and that writing here has helped me grow up and get to know myself a bit more... Imagine that, internalising through broadcasting my thoughts and other stuff out there. As a result of Ellebug (or The Happy Hufflepuff as we began so humbly three years ago), the work I've been doing, and the people I've met and become close to, I've built a strong appreciation for the art of reflection in the course of self discovery. I still have a long way to go, but it's nice to have these handy tricks and tools to help me cope with feelings of stress and the occasional unprovoked discontentment that many of my fellow Gen Ys suffer from.

Right now, where I am... there are a few big decisions that I will have to make over the next year, sort of the big ones to take me through the last few years of my twenties. Hard to believe when I started this thing that I was in a different age bracket. Goshdarnit.

Okay, enough wallowing and vague sharing, let's get down to business to defeat the Huns. I saw this recipe in my favourite food magazine, Delicious UK last year and knew that it would be THE cake I'm baking for my three year blog anniversary. Eric Lanlard's epic celebration chocolate cake may have a longer list of ingredients than I usually prefer, but ooooh baby, was this cake worth it! I'm definitely going to be making this cake again, though in future I may substitute the butter icing filling with something more tangy. This cake was also the perfect one to go with cos it showcases my three favourite things: chocolate, ganache frosting, and berries.


And to make it extra special, I used only the best Lindt dark chocolate (75% single source) for the cake, the butter icing, and the chocolate ganache. It's ok to splurge every now and then.

Blackberry Lindt Cake (Eric Lanlard's Chocolate Celebration Cake)
For the cake:
  • 350g unsalted butter, softened
  • 350g golden caster sugar
  • 50ml black treacle
  • 8 large free-range eggs
  • 50g dark chocolate (at least 70 per cent cocoa solids), melted
  • 1 tbsp chocolate extract 
  • 2 tsp vanilla extract
  • 2 tsp coffee extract
  • 300g self-raising flour
  • 50g cocoa powder
  • 2 tsp baking powder
  • 50g ground almonds
  • Blackberries to decorate (optional)
  1. Preheat the oven to 170°C/fan and line and grease 1 6" deep round baking pan and 1 8" deep round baking pan
  2. Combine the flour, cocoa powder, and baking powder in a medium bowl and set aside
  3. In a large bowl, beat the butter and sugar until light, then add the treacle and continue to beat gently 
  4. Beat the eggs in one at a time, until light and fluffy then slowly add the melted chocolate
  5. Add the chocolate, vanilla and coffee extracts
  6. Add the flour until thoroughly combined then fold in the ground almonds with a rubber spatula
  7. Divide the batter between the two baking pans, filling each to roughly 3/4 up the pans
  8. Bake for 55 minutes for the 6" cake, and 1 hour 15 minutes for the 8" cake, or until a skewer inserted at an angle comes out clean. Remove from the oven and allow the cakes to cool for 10 minutes in the pans, then turn them upside down onto a wire rack to cool completely
For the butter icing:
  • 125g unsalted butter, softened
  • 200g icing sugar, sifted
  • 1 tsp vanilla extract
  • 2 tsp chocolate extract
  • 30g dark chocolate (70 per cent cocoa solids), melted
  • 2 tbsp whipping cream
Whisk the butter and icing sugar until mixed, then add the extracts and dark chocolate. Continue to whisk until combined, then beat in the whipping cream. Pop the bowl into the fridge to allow it to solidify slightly while the cakes cool, but be sure to take it out before you fill the cakes to let it soften.

For the ganache:
  • 250g single cream
  • 2 tsp vanilla bean paste or extract
  • 2 tbsp light corn syrup
  • 250g dark chocolate (70 per cent cocoa solids), melted
  • 25g unsalted butter, softened
  1. Heat the cream in a saucepan over a low heat, then add the vanilla and light corn syrup and stir gently with a spatula until mixed
  2. Chop the chocolate and place in a medium sized heatproof bowl, pour the heated cream over the chocolate and let it sit for a few seconds before stirring with a spatula to melt it down. If necessary, put the bowl in the microwave for 20 seconds to reheat 
  3. Stir in the butter, pop the bowl into the fridge to chill slightly before decorating
Assembling the cake:
Slice both cakes into three layers using a long serrated knife, then top each layer with the butter icing. Once all six layers are stacked, cover with ganache frosting in a happily haphazard manner. Top with fresh blackberries, or raspberries, or strawberries, or chocolate curls, or really anything you like. Enjoy with a cup of coffee. 

Also, you may have noticed that the look of the site has changed a little bit. In conjunction with my three-year anniversary, I've decided to give Ellebug a little treat! The new logo is care of the brilliant Zurisha over at Tinytype: Propfolio. Please go check out her stuff, order from her, just go talk to her. She's lovely! Thanks so much, Sha, I'm completely smitten by the little ladybug B and the whole thing! So cute! So terribly, terribly cute!

On a different note, is it smitten with, or smitten by? Couldn't find a conclusive answer to this, and now I am legitimately worried I may have been making a mistake my whole life and will continue to make this mistake if I don't find out!

Best Chocolate Cake & lots of sugar

This was a bit of a long weekend for me, in that I did so much stuff! Before we go on, let me just give you some context: I have the tendency to be a hermit. People don't know this, but I'm actually an introvert; I enjoy spending time with myself, doing things I like that everybody else thinks is geeky or weird, getting lost in series of epic fantasy books, baking and blogging about it, not wearing lots of constricting clothes, or going out without planning to go out and getting myself in the mindset for getting tired and meeting people well in advance.

But after my recent reminder of mortality (ie birthday), I had to shake myself and made the decision to just have a friggin life. It's not that I don't enjoy my recluse ways, it's just that other people think I'm depressed or lonely or some such nonsense. So this weekend, I made an effort.
First of all, my dad celebrated his birthday, and while it doesn't involve going "out" out, we did have a nice dinner, for which every member of the family made an attempt to dress up and get spiffy. He's incredibly shy about being celebrated, however, so in the picture above you'll see him pretending that it's my sister's birthday.
Crazy good cheese & lemon tarts, Forty Licks ice cream, and Poached Pears in Red Wine popsicles (say whuuut?)
Then there was the Food Bites bazaar on Saturday, where I ran into quite a few old friends and acquaintances (one even remarked that he hasn't seen me in 2 years, and that he thought I'd left town again) and tried lots of good food. My friend had also set up a stall selling his Forty Licks ice cream, which was the main reason I had gone to the bazaar. Then I just stayed for the food, music and booze lol.
Alena and I catching some sun, my favourite girls, and my favourite boys x
My best friend, Jessica, and my cousin, Azie, with our Deer Society slushies at the Food Bites bazaar
And on Sunday night, my friend Alena and I decided to make pear and gorgonzola pizza! It was a bit of a disaster (note to self: read a recipe before attempting pizza dough), but we had so much fun doing it and have made grand plans to try making ravioli/jambalaya next weekend. I would share a pizza recipe with you, but that will have to wait until I've figured it out LOL.
Makeshift rolling pin, first taste of our pizza, Alena doing the honours
However, I do have a really good recipe that I am more than happy to share with you right now. It's my go-to chocolate cake recipe, given to me by my baking guru, Aunty Rosa. It's the cake she used to make for my birthdays when I was growing up, and it has always been my benchmark for chocolate cake. I did make some tiny tweaks to it to suit my tastes, but for this cake order from a friend of mine, I made it just the way she did.

Here it is, a two tier chocolate and butter cake with chocolate and vanilla buttercream, inspired by Amanda's Neapolitan Rose cake. My buttercream was giving me issues though, which seems to always happen whenever it matters. Murphy's law applies.
It has been so long since I've piped anything that it took me ages to get a hang of it again. I probably went through a good quarter of the buttercream just trying to get the pressure right. I definitely need to get back into it, just keep practicing even though I'm not a big fan of frosting on my own cakes. Mini cakes it is then!
The cake order was for a friend's parents' 40th wedding anniversary, as well as for her own birthday (the top tier is for her lol). I really do hope that the flavour was okay, and that they enjoyed the cake. It's always really daunting to make cakes for orders cos you never know how it's going to turn out.
Chocolate Cake

  • 175g butter, softened
  • 250 g dark soft brown sugar
  • 2 tbsp golden syrup
  • 3 large eggs
  • 1 tsp vanilla extract
  • 60g cocoa powder
  • 250g all purpose flour
  • 1 tsp baking powder
  • 1/2 tsp baking soda
  • 1/4 tsp salt
  • 100ml yoghurt/sour cream

Preheat the oven to 180C, line a 9" baking tin, or 2 8" baking tins, and mix all ingredients in a large mixing bowl. Pour into pan and bake for 35 - 45 minutes. Allow to cool in pan for 5 minutes before removing onto a wire rack to cool completely. Serve warm with a drizzle of dark chocolate ganache :D

I usually whip up some simple chocolate icing to pour over this chocolate cake, but for the purposes of these chocolate roses, I used the same chocolate buttercream recipe that Amanda used for her cake. Next time I make this chocolate cake as I usually do, I'll be sure to snap some pretty pictures and post my favourite dark chocolate ganache recipe.
Lots of love!

Monday

First Stacked Cake

Photobucket
I received an order (from my mother) to bake a cake for 100 people last week, and so I spent all week thinking up ways to make a cake that big... Big rectangular cake? Separate cakes? Cupcakes? And since I definitely did NOT want to go with cupcakes (it's so done, ya know?) I thought... why not take this opportunity to try making my first ever stacked cake?

Yes, ambitious, considering I had just three days to do it. I usually don't take such late orders, but since it was for my mother and she was buying everything anyway, I thought I'd give it a shot.

I read every bit of advice I could find on the net, though I admit to not conducting thorough research on the subject. Click on those links for some great cake-making tips though, especially the smitten kitchen link, wowza, is she amazing or is she amazing?

It was actually a lot easier than I anticipated, though I kinda underestimated the height of my cake layers and baked too many. I thought I would need three layers per cake (which would mean a total of nine layers), but when all was said and done... I just needed the basic two. So I had three extra left over in the freezer (show you what I did to them later).

I tried a new recipe for this cake, which is silly. You would have thought I'd learned my lesson not to make new recipes for last minute orders by now, but of course not! I don't have the ability to retain knowledge. It was relatively simple, and turned out quite well! Though not as chocolatey as I had hoped.

Chocolate cake recipe
makes 2 8-inch round pan cakes, or 3 6-inch round pan cakes

  • 150g self-raising flour
  • 3 tbsp 70% cocoa powder
  • 175g unsalted butter, completely softened
  • 175g caster sugar
  • 1 tsp baking powder
  • 3 eggs
  • 1/4 cup buttermilk


  1. Preheat the oven to 180C, grease and flour your pans (I used 2 8-inch round pans, and 3 6-inch round pans)
  2. Combine all the cake ingredients in a large bowl and beat with your electric mixer on medium speed until all ingredients are fully incorporated
  3. Pour into the prepared pans and bake for 25 minutes, or until a skewer inserted through the middle comes out clean, allow the cake to cool in the pan for 5 minutes before carefully removing onto a cooling rack where it will cool completely

I baked four batches of this recipe for the cake (though in hindsight, I only needed three), then wrapped them in cling wrap and popped them in the freezer for around two hours while I went out for dinner. When you remove cake from the freezer, you may want to re-moisten the layers with some sugar syrup... or I prefer to use 3 parts hot water, 1 part vanilla essence, and brush it over the layers.
For the filling, I had gotten quite lazy and used raspberry and strawberry preserve (raspberry for the top and bottom layers). The cakes were then covered with the following chocolate buttercream.
Photobucket
Chocolate Buttercream recipe

  • 1/2 cup vegetable shortening
  • 1/2 cup butter, softened
  • 3/4 cup cocoa powder
  • 1 tsp vanilla essence
  • 3 cups sifted confectioners sugar
  • 3-4 tbsp milk


  1. Cream the shortening and butter until light and fluffy
  2. Add cocoa powder and vanilla and whisk into the butter and fully incorporated
  3. Add sugar, 1/2 cup at a time, beating well after each addition
  4. Slowly add milk whenever the mixture gets too clumpy
  5. Add colouring as you wish (I went with 2 tsp of red colouring to give it that shade), and if keeping in the fridge, be sure to allow the buttercream to thaw slightly then re-whip before spreading
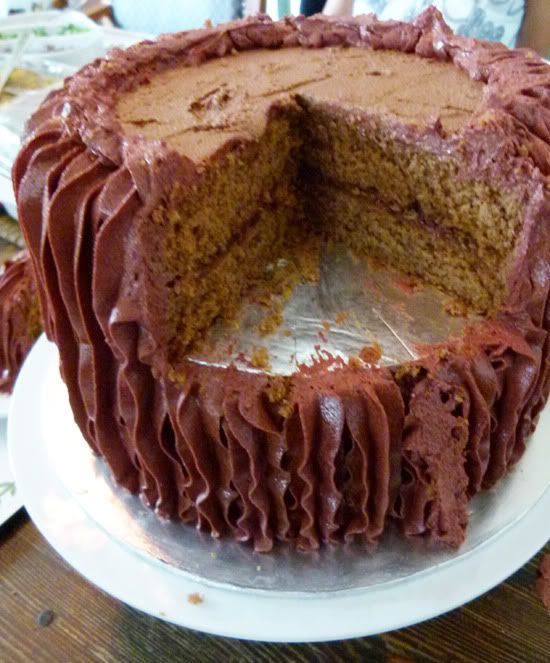
For this particular cake, including frosting and the thin crumb coating, I used 1.5 batches of this icing. It turned out quite well, particularly with the bitter-sweet cocoa powder, as it wasn't as sickeningly sweet as I was afraid it might be. I used a Wilton 1M tip and just drew a line from the bottom of the cake all the way to the top. Check out what it looked like once they'd cut into it. Dear lord.
Unfortunately, no matter how careful you are with baking and wrapping and stacking... and as this was my first time... of course my lowest layer didn't match up with the second layer. I had to patch it up with buttercream, which gave me quite a fright... Then there was the whole process with the dowels, and how they wouldn't stay even! 
Though luckily, everyone left with only one slice to go on the 2nd tier! I took that lowest layer out to my work area, scooped and smoothed and patted down until all we were left with was the barest layer of frosting. I thought, no, no... I'm tossing the rest of this frosting out, there is no way I'm putting any of that anywhere near my already relentless cellulite. So we ended up with two of these (I whipped out the extra layers from the freezer and scooped up enough frosting from the lowest layer to cover that!):
Photobucket
Those just looked so much more... manageable, to me. The frosting started to scare me a bit, and the longer I stared at it, the more paranoid I became! How on earth was that going to affect my ability to fit into clothes, right? 
ARGH. Anyway, enough of all this post-holiday-guilt talk. I'm definitely going to give this stacking business a few more tries, until I get it absolutely perfect! Who knows... I may start using fondant... despite the fact that I hate the taste of it... 
Cheers! 
Nabs 
P.S. Sorry if this post sounded kinda weird, it's just Monday blues, ya know?