Showing posts with label celebration cake. Show all posts

Wednesday

Lemony Rainbow Cake

Everyone and their mother is either baking or ordering a Rainbow Cake these days. It's cute, I admit I gasped the first time I saw that picture on Whisk Kid's blog, and then I'm quite sure I was throwing up rainbows when Sweetapolita posted her Rainbow Doodle cake up. My friends Soraya, Pri and I even went around to an obscure bakery in Bangsar to check out their rainbow cake!

It was delicious... but disappointing. It was more of a tie-dye cake than a rainbow cake.

But when my cousin texted me last week to say that her daughter had especially requested for "Auntie Nabiya" to bake her a rainbow cake for her birthday... I jumped at the chance. I may not ever want a rainbow cake for myself, so this was my first opportunity to try out the colours without having to deal with the excess lying around in my fridge because nobody in my household wants to eat that much colouring on a normal day.
Also, how can I say no when she calls me Auntie Nabiya so sweetly? Darn these little girls and boys, they know exactly how to play their cards with me. It doesn't take much, really, I'm a sucker for big eyes and apple cheeks.

So this particular niece of mine, or second cousin once removed, turns eight today! Eight? I can't quite believe how much she, and the other cousins, have grown up so much. I keep thinking that they're all still five or six, and then they turn around and give me this condescending look, followed by an, "I'm *insert some ridiculously high number here* years old, you know?"

I'm getting old. LOL. Let's just get on with the rainbow cake, shall we?
Rainbow Cake
adapted from Whisk Kid's recipe
  • 250g butter, room temperature
  • 425g caster sugar
  • 5 large eggs
  • 2 tsp vanilla
  • 425g all purpose flour
  • 4 tsp baking powder
  • 1/2 tsp salt
  • 1 1/2 cup milk
  • Food colouring gel: Red, orange, yellow, green, blue and purple
  1. Preheat the oven to 180C and butter and line your 9"inch springform baking tins with parchment. Use as many as you have, I only have 2 so had to bake my layers in three batches
  2. In a medium bowl sift the flour, baking powder and salt, then set aside
  3. In the large bowl of your mixer, cream the butter and sugar until light and fluffy
  4. Add the eggs and vanilla and beat until incorporated
  5. Then add 1/3 of the flour mixture, beat until just combined, add half of the milk, beat again, and keep doing this until you finish off with the last of the flour
  6. Split the batter evenly into six bowls (roughly 1 cup per bowl by my count) and add the colouring until you achieve the shade you want the layers to take on
  7. Bake each layer for 15 minutes, or until a skewer poked through comes out clean. Change the parchment paper after every layer if you're reusing the tins
  8. Allow to cool in the pan for a few minutes before you run a butter knife around the edge of the cake then pop them onto the cooling tray. Once they've cooled completely, wrap them in cling wrap and pop them in the freezer to firm up before you even them out. I left mine in overnight as I baked the layers around 2 am
  9. When ready to assemble, take the layers out of the freezer and allow them to come down to room temp
First slice is the deepest... oh man, you have no idea how relieved I was at this point!

Lemony Swiss Meringue Buttercream
  • 7 egg whites
  • 325g caster sugar
  • 360g butter, softened
  • 2 tsp lemon extract
  1. Cook the egg whites and sugar over a bain-marie, whisking gently until the sugar is completely dissolved
  2. Then transfer the mixture into your completely grease-free mixing bowl and whisk for 5-8 minutes, or until the bowl has cooled to room temperature, and soft peaks have formed in the meringue
  3. This hurts, but next you throw in the butter, a tbsp at a time and allow it to mix and curdle into the meringue
  4. Keep whisking until all the butter is added, then switch to a paddle attachment, add the lemon extract and beat until smooth
More cousins!
Here's another one of the birthday girl being all cute and camera shy

The cake was a huge hit with the 8-25 year old crowd gathered at my niece's birthday party, and I absolutely LOVE how the layers turned out so clean! I was terrified I'd end up with crumbly, uneven layers. But that moment of truth when you cut into a rainbow cake is definitely a moment you'll never forget.
Happy birthday, Double Love,
x Aunty Nabiya

Ladies Who Lunch: Mama Zee's Birthday


I consider myself lucky that I have an amazing mother. She is strong, smart, beautiful, intuitive, possesses far more talent in her pinky finger than I do in my entire body, and so full of love that she has shared so generously with everyone around us. My mother really is the best.

Most people are blessed with great mothers, but in our very close-knit circle of friends and extended family, we are exceptionally lucky in that we have a wonderful team of mothers. Best friends for most (if not all, actually) of our (the children's) lives, they have raised us as a group, poured their love on us, shared wisdom wrought from their own lives, listened to our boy troubles, endured our rants, and basically have just been there.
Photobucket
Today one of them celebrates a birthday, and in true Team Mama fashion, they organised a long lunch this afternoon (midweek public holiday, yay!), pooled together for an extravagant present (this year, Portmeirion is all the rage among the group), and sat over good food, laughing, sharing stories and taking every opportunity to scandalise Nisa, Kaly, her hapless boyfriend, and myself with innuendo and downright disturbing comments.
Photobucket
Mama Zee, being one of my six mothers, obviously deserves to get a homemade birthday cake! No bakery cake for any of my mamas, no way. I may not be able to afford to buy a Portmeirion teacup (or even a saucer), but this I can definitely do.

After my friend, Amy's hen night karaoke session last night (I know, you're thinking... where is that blog post?), I hauled myself home, washed my face and found that I couldn't sleep. All I could think about was a cake for Mama Zee! I knew there was no way in hell I'd be able to wake up early enough to do it, and I had actually planned on just baking the cake layers ahead of time, then frosting in the morning... but when I finally did crawl back into bed, the clock read 5.30am.

It was well worth it though. I decided to tackle Swiss Meringue Buttercream for the first time (3am decisions, they make sense sometimes) considering The Mothers have always harangued me for my too-sweet buttercream. It was surprisingly easier than anticipated, and wowweee at that silky-smooth texture and lack of sickening sweetness! Can't believe it took me this long to try it, and now that I have, I think I may have to stick with it...
Photobucket
I used my favourite white cake recipe, which I then divided into four bowls (roughly 1 1/2 cups per bowl) and coloured in increasing shades of pink (a teeeeeeeny tiny drop of Wilton Pink colouring gel in the first bowl, one drop in the second, 2 drops in the third, and 3 drops in the fourth). I baked the cakes in 6-inch round pans, all at once for 25-30 minutes, then popped them in the freezer (triple cling-wrapped) for half an hour.

With leftover blackberries from my Upside-down Blackberry Buttermilk cake, I whipped up a Blackberry Coulis for filling the layers. I've got some coulis leftovers now... watch this space to see what I do with it.

Blackberry Coulis
  • 250g fresh blackberries
  • 1/4 cup brown sugar
  • 1/2 tsp vanilla extract
  • 1/2 cup water
  1. In a saucepan, bring the blackberries, sugar and water to a boil. Simmer until the fruit is mushy then stir in the vanilla
  2. Remove from heat, allow it to cool then pour it all into a blender and whizz to a puree
  3. Strain the puree through a sieve, then slather your cake layers with the goop
Swiss Meringue Buttercream

  • 2 large egg whites
  • 1/2 cup sugar
  • 180g butter, softened
  • 1/2 tsp vanilla
  1. Whisk the egg whites and sugar until sugar is completely dissolved in a heatproof bowl over a bain-marie
  2. Transfer to your mixing bowl, and with your whisk attachment, whisk the mixture at medium speed for about 4-5 minutes until soft peaks form (hello, meringue!). Add the vanilla.
  3. At this point, slowly add butter into the mixture, by tablespoon-fulls. Continue until all the butter is in, and just whip until the point where when you run a spatula through it... it comes up looking beautifully smooth
If you have a stand mixer, I suggest you step away during that last step of the swiss meringue process. It looks terrifying, and you'll be tempted to "fix" it, as it seems as if the mixture is curdling. But don't you worry, darlings, it's meant to be that way. It will improve upon extended whipping. My tiny batch took roughly 5-8 minutes to finally arrive at a consistency I was happy with.
 
And what a beautiful taste the frosting produces! For the first time, my frosting has not overwhelmed the flavours of my cake, and as The Mothers enjoyed the cake quite a bit... I like to think I did it right this time. No complaints of "Nabiya! This is soooo sweet!" or "A moment on the lips..." and you know how it goes.
Photobucket
Anyway, happy birthday, Mama Zee, hope you enjoyed the lunch and love you loads!

xx Nabs

Monday

First Stacked Cake

Photobucket
I received an order (from my mother) to bake a cake for 100 people last week, and so I spent all week thinking up ways to make a cake that big... Big rectangular cake? Separate cakes? Cupcakes? And since I definitely did NOT want to go with cupcakes (it's so done, ya know?) I thought... why not take this opportunity to try making my first ever stacked cake?

Yes, ambitious, considering I had just three days to do it. I usually don't take such late orders, but since it was for my mother and she was buying everything anyway, I thought I'd give it a shot.

I read every bit of advice I could find on the net, though I admit to not conducting thorough research on the subject. Click on those links for some great cake-making tips though, especially the smitten kitchen link, wowza, is she amazing or is she amazing?

It was actually a lot easier than I anticipated, though I kinda underestimated the height of my cake layers and baked too many. I thought I would need three layers per cake (which would mean a total of nine layers), but when all was said and done... I just needed the basic two. So I had three extra left over in the freezer (show you what I did to them later).

I tried a new recipe for this cake, which is silly. You would have thought I'd learned my lesson not to make new recipes for last minute orders by now, but of course not! I don't have the ability to retain knowledge. It was relatively simple, and turned out quite well! Though not as chocolatey as I had hoped.

Chocolate cake recipe
makes 2 8-inch round pan cakes, or 3 6-inch round pan cakes

  • 150g self-raising flour
  • 3 tbsp 70% cocoa powder
  • 175g unsalted butter, completely softened
  • 175g caster sugar
  • 1 tsp baking powder
  • 3 eggs
  • 1/4 cup buttermilk


  1. Preheat the oven to 180C, grease and flour your pans (I used 2 8-inch round pans, and 3 6-inch round pans)
  2. Combine all the cake ingredients in a large bowl and beat with your electric mixer on medium speed until all ingredients are fully incorporated
  3. Pour into the prepared pans and bake for 25 minutes, or until a skewer inserted through the middle comes out clean, allow the cake to cool in the pan for 5 minutes before carefully removing onto a cooling rack where it will cool completely

I baked four batches of this recipe for the cake (though in hindsight, I only needed three), then wrapped them in cling wrap and popped them in the freezer for around two hours while I went out for dinner. When you remove cake from the freezer, you may want to re-moisten the layers with some sugar syrup... or I prefer to use 3 parts hot water, 1 part vanilla essence, and brush it over the layers.
For the filling, I had gotten quite lazy and used raspberry and strawberry preserve (raspberry for the top and bottom layers). The cakes were then covered with the following chocolate buttercream.
Photobucket
Chocolate Buttercream recipe

  • 1/2 cup vegetable shortening
  • 1/2 cup butter, softened
  • 3/4 cup cocoa powder
  • 1 tsp vanilla essence
  • 3 cups sifted confectioners sugar
  • 3-4 tbsp milk


  1. Cream the shortening and butter until light and fluffy
  2. Add cocoa powder and vanilla and whisk into the butter and fully incorporated
  3. Add sugar, 1/2 cup at a time, beating well after each addition
  4. Slowly add milk whenever the mixture gets too clumpy
  5. Add colouring as you wish (I went with 2 tsp of red colouring to give it that shade), and if keeping in the fridge, be sure to allow the buttercream to thaw slightly then re-whip before spreading
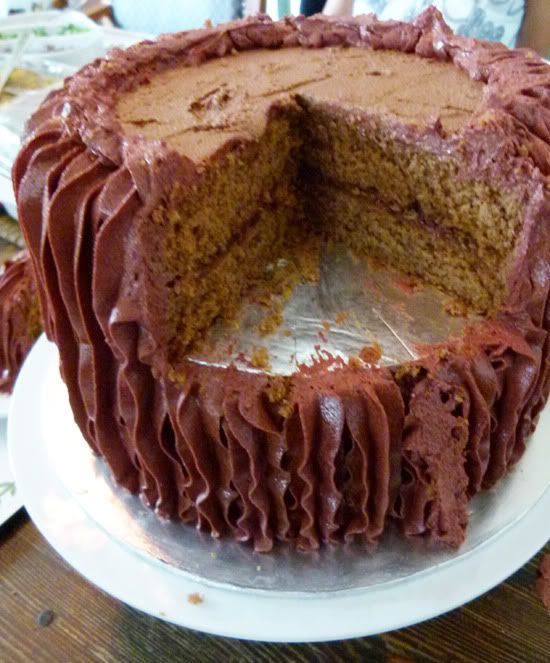
For this particular cake, including frosting and the thin crumb coating, I used 1.5 batches of this icing. It turned out quite well, particularly with the bitter-sweet cocoa powder, as it wasn't as sickeningly sweet as I was afraid it might be. I used a Wilton 1M tip and just drew a line from the bottom of the cake all the way to the top. Check out what it looked like once they'd cut into it. Dear lord.
Unfortunately, no matter how careful you are with baking and wrapping and stacking... and as this was my first time... of course my lowest layer didn't match up with the second layer. I had to patch it up with buttercream, which gave me quite a fright... Then there was the whole process with the dowels, and how they wouldn't stay even! 
Though luckily, everyone left with only one slice to go on the 2nd tier! I took that lowest layer out to my work area, scooped and smoothed and patted down until all we were left with was the barest layer of frosting. I thought, no, no... I'm tossing the rest of this frosting out, there is no way I'm putting any of that anywhere near my already relentless cellulite. So we ended up with two of these (I whipped out the extra layers from the freezer and scooped up enough frosting from the lowest layer to cover that!):
Photobucket
Those just looked so much more... manageable, to me. The frosting started to scare me a bit, and the longer I stared at it, the more paranoid I became! How on earth was that going to affect my ability to fit into clothes, right? 
ARGH. Anyway, enough of all this post-holiday-guilt talk. I'm definitely going to give this stacking business a few more tries, until I get it absolutely perfect! Who knows... I may start using fondant... despite the fact that I hate the taste of it... 
Cheers! 
Nabs 
P.S. Sorry if this post sounded kinda weird, it's just Monday blues, ya know?