Showing posts with label buttercream. Show all posts

Sunday

Ruffles & Roses


I haven't been testing out new recipes lately due to being busy with some orders I've received from friends and friends of friends for their weddings, bridal showers, baby showers, and the such. It's been a very looooong few weeks, and I've been thinking that it's time to try out some new recipes.

What though? It's getting harder to just bake a dessert when I've made the conscious decision to get fit. LOL. All that holibaking really wasn't great for the waistline. So, I hope you'll bear with me as I regroup and find new recipes to try and share. There will probably be a few big ones coming up in the next two weeks ;)

In the meantime, I leave you with this lame filler post, and some pictures of the wedding cakes I've done in the past few weeks.

Lots of love, Nabs

Friday

A Very Happy Unbirthday


I've definitely moved past the pretense of having reasons for baking anything. As you can see from the image above, every day is cake day if we go by the the Mad Hatter's habit of celebrating Unbirthdays. Which I wholly subscribe to.

This beetroot chocolate cake was long overdue, however, as Jessica and Angie have been asking me to make it since I made it last (Angie's birthday). So as we were due for a lunch meetup, I thought I'd bring a treat for the Unbirthday girls.
For this particular rendition of the cake, I used the exact same recipe that I used here, but added a touch of Wilton's delphinium blue colouring to the cream cheese frosting (in 2 different degrees of colour) to create the effect that the lovely Miz Rosie posted over at her crazy cool blog, Sweetapolita.

Didn't quite pull it off as she did, as my frosting was a little too runny, but I think it's still quite adorable.
If you're looking for a heavy, beautiful chocolate cake, I suggest you give this recipe a shot and treat yourself to an Unbirthday Cake.

I'm saving my recipe share for the next post, and this one is more of a picture dump of the stuff I've been up to in the past week, so please bear with me as I share the more mundane details of my personal life with you.

Above is a collection of iPhone pictures I took of the wedding cake and cupcakes order that I received a few weeks ago. For the cake, I used 4 layers of my favourite white cake recipe, with lemon curd filling and lemony swiss meringue buttercream. To decorate the cake, I used the Wilton 127 tip and swirled around on my revolving cake stand. The cupcakes were in 3 flavours: chocolate, earl grey, and the white cake, using plain swiss meringue buttercream, piped on with Wilton's 104/103/61 tips. I made 2 full batches (the recipe in the link is a quarter portion of a full batch) of the frosting recipe for both the cake and cupcakes, and coloured them in 4 shades of pink.
Then my two favourite Sarawakian Siblings and I decided to finally get down to business and try our hands and making our own pasta. The first batch (you can see the cling wrapped roll on the lower left hand side of the picture above) didn't turn out very well as we might have used too few eggs (note to self: always read the whole recipe twice before trying)...

For the second batch, we got some valuable advice from a very skilled friend of the families, on the optimal egg to flour ratio (100g flour:3 eggs), and went a little gentler with the mixing. I'm not too sure what went into the sauce, as that was J's area, while Al and I worked meticulously on the rolling, filling (ricotta cheese), and cutting out of the ravioli.
All in all, we had a great meal, and so much fun preparing it. I've had a great time these past few weeks with the baking and cooking, and general experimenting with flavours and ingredients. Honestly, I can't wait to see what the coming weeks will have in store for me. 
I leave you with this gem that J found, as it's been my kitchen soundtrack for a week now, and I love it! 

Wednesday

Best Chocolate Cake & lots of sugar

This was a bit of a long weekend for me, in that I did so much stuff! Before we go on, let me just give you some context: I have the tendency to be a hermit. People don't know this, but I'm actually an introvert; I enjoy spending time with myself, doing things I like that everybody else thinks is geeky or weird, getting lost in series of epic fantasy books, baking and blogging about it, not wearing lots of constricting clothes, or going out without planning to go out and getting myself in the mindset for getting tired and meeting people well in advance.

But after my recent reminder of mortality (ie birthday), I had to shake myself and made the decision to just have a friggin life. It's not that I don't enjoy my recluse ways, it's just that other people think I'm depressed or lonely or some such nonsense. So this weekend, I made an effort.
First of all, my dad celebrated his birthday, and while it doesn't involve going "out" out, we did have a nice dinner, for which every member of the family made an attempt to dress up and get spiffy. He's incredibly shy about being celebrated, however, so in the picture above you'll see him pretending that it's my sister's birthday.
Crazy good cheese & lemon tarts, Forty Licks ice cream, and Poached Pears in Red Wine popsicles (say whuuut?)
Then there was the Food Bites bazaar on Saturday, where I ran into quite a few old friends and acquaintances (one even remarked that he hasn't seen me in 2 years, and that he thought I'd left town again) and tried lots of good food. My friend had also set up a stall selling his Forty Licks ice cream, which was the main reason I had gone to the bazaar. Then I just stayed for the food, music and booze lol.
Alena and I catching some sun, my favourite girls, and my favourite boys x
My best friend, Jessica, and my cousin, Azie, with our Deer Society slushies at the Food Bites bazaar
And on Sunday night, my friend Alena and I decided to make pear and gorgonzola pizza! It was a bit of a disaster (note to self: read a recipe before attempting pizza dough), but we had so much fun doing it and have made grand plans to try making ravioli/jambalaya next weekend. I would share a pizza recipe with you, but that will have to wait until I've figured it out LOL.
Makeshift rolling pin, first taste of our pizza, Alena doing the honours
However, I do have a really good recipe that I am more than happy to share with you right now. It's my go-to chocolate cake recipe, given to me by my baking guru, Aunty Rosa. It's the cake she used to make for my birthdays when I was growing up, and it has always been my benchmark for chocolate cake. I did make some tiny tweaks to it to suit my tastes, but for this cake order from a friend of mine, I made it just the way she did.

Here it is, a two tier chocolate and butter cake with chocolate and vanilla buttercream, inspired by Amanda's Neapolitan Rose cake. My buttercream was giving me issues though, which seems to always happen whenever it matters. Murphy's law applies.
It has been so long since I've piped anything that it took me ages to get a hang of it again. I probably went through a good quarter of the buttercream just trying to get the pressure right. I definitely need to get back into it, just keep practicing even though I'm not a big fan of frosting on my own cakes. Mini cakes it is then!
The cake order was for a friend's parents' 40th wedding anniversary, as well as for her own birthday (the top tier is for her lol). I really do hope that the flavour was okay, and that they enjoyed the cake. It's always really daunting to make cakes for orders cos you never know how it's going to turn out.
Chocolate Cake

  • 175g butter, softened
  • 250 g dark soft brown sugar
  • 2 tbsp golden syrup
  • 3 large eggs
  • 1 tsp vanilla extract
  • 60g cocoa powder
  • 250g all purpose flour
  • 1 tsp baking powder
  • 1/2 tsp baking soda
  • 1/4 tsp salt
  • 100ml yoghurt/sour cream

Preheat the oven to 180C, line a 9" baking tin, or 2 8" baking tins, and mix all ingredients in a large mixing bowl. Pour into pan and bake for 35 - 45 minutes. Allow to cool in pan for 5 minutes before removing onto a wire rack to cool completely. Serve warm with a drizzle of dark chocolate ganache :D

I usually whip up some simple chocolate icing to pour over this chocolate cake, but for the purposes of these chocolate roses, I used the same chocolate buttercream recipe that Amanda used for her cake. Next time I make this chocolate cake as I usually do, I'll be sure to snap some pretty pictures and post my favourite dark chocolate ganache recipe.
Lots of love!

Earl Grey Tea Buttercream

The word Posh is often mistakenly believed to be derived as an acronym of the term "Portside Out, Starboard Home" referring to the first class cabins in ships back in the olden days when people travelled by sea. Posh is alo most commonly related to Victoria Beckham, one of our favourite Spice Girls (girl powah!).

Whenever I drink Earl Grey tea with a wedge of lemon, and have a pot of proper Devonshire Clotted Cream at hand to slather on my scones, I also like to poke my pinky finger out in the air to milk the posh-ness of the situation. Over the weekend, I definitely up-ed the posh metre in my house with pots of tea, warm scones and these beautiful babies...

For the cake and cupcakes, I simply made two batches of this Earl Grey tea cake recipe I made before. For the cupcakes, I baked at 180C for 20 minutes, and the cake for 45 minutes in an 8-inch round pan.

Earl Grey tea Buttercream
  • 2 1/2 cups powdered sugar, sifted
  • 113g butter, softened
  • 2 bags Earl Grey tea + 4 tbsp scalding hot water (steep for 20 minutes) 
  1. Cream the butter and sugar, then gradually beat in the tea and beat for another 3-5 minutes until a smooth consistency is achieved
  2. Scoop the icing into a piping bag and pipe away! 
 
According to my very fussy, incredibly anti-buttercream brother, Adam, this was his favourite frosting on any cake I've made thus far. So I figured it must mean that it's good. Also, one batch of this frosting can cover 20 regular sized cupcakes and 1 8-inch round cake.

Monday

First Stacked Cake

Photobucket
I received an order (from my mother) to bake a cake for 100 people last week, and so I spent all week thinking up ways to make a cake that big... Big rectangular cake? Separate cakes? Cupcakes? And since I definitely did NOT want to go with cupcakes (it's so done, ya know?) I thought... why not take this opportunity to try making my first ever stacked cake?

Yes, ambitious, considering I had just three days to do it. I usually don't take such late orders, but since it was for my mother and she was buying everything anyway, I thought I'd give it a shot.

I read every bit of advice I could find on the net, though I admit to not conducting thorough research on the subject. Click on those links for some great cake-making tips though, especially the smitten kitchen link, wowza, is she amazing or is she amazing?

It was actually a lot easier than I anticipated, though I kinda underestimated the height of my cake layers and baked too many. I thought I would need three layers per cake (which would mean a total of nine layers), but when all was said and done... I just needed the basic two. So I had three extra left over in the freezer (show you what I did to them later).

I tried a new recipe for this cake, which is silly. You would have thought I'd learned my lesson not to make new recipes for last minute orders by now, but of course not! I don't have the ability to retain knowledge. It was relatively simple, and turned out quite well! Though not as chocolatey as I had hoped.

Chocolate cake recipe
makes 2 8-inch round pan cakes, or 3 6-inch round pan cakes

  • 150g self-raising flour
  • 3 tbsp 70% cocoa powder
  • 175g unsalted butter, completely softened
  • 175g caster sugar
  • 1 tsp baking powder
  • 3 eggs
  • 1/4 cup buttermilk


  1. Preheat the oven to 180C, grease and flour your pans (I used 2 8-inch round pans, and 3 6-inch round pans)
  2. Combine all the cake ingredients in a large bowl and beat with your electric mixer on medium speed until all ingredients are fully incorporated
  3. Pour into the prepared pans and bake for 25 minutes, or until a skewer inserted through the middle comes out clean, allow the cake to cool in the pan for 5 minutes before carefully removing onto a cooling rack where it will cool completely

I baked four batches of this recipe for the cake (though in hindsight, I only needed three), then wrapped them in cling wrap and popped them in the freezer for around two hours while I went out for dinner. When you remove cake from the freezer, you may want to re-moisten the layers with some sugar syrup... or I prefer to use 3 parts hot water, 1 part vanilla essence, and brush it over the layers.
For the filling, I had gotten quite lazy and used raspberry and strawberry preserve (raspberry for the top and bottom layers). The cakes were then covered with the following chocolate buttercream.
Photobucket
Chocolate Buttercream recipe

  • 1/2 cup vegetable shortening
  • 1/2 cup butter, softened
  • 3/4 cup cocoa powder
  • 1 tsp vanilla essence
  • 3 cups sifted confectioners sugar
  • 3-4 tbsp milk


  1. Cream the shortening and butter until light and fluffy
  2. Add cocoa powder and vanilla and whisk into the butter and fully incorporated
  3. Add sugar, 1/2 cup at a time, beating well after each addition
  4. Slowly add milk whenever the mixture gets too clumpy
  5. Add colouring as you wish (I went with 2 tsp of red colouring to give it that shade), and if keeping in the fridge, be sure to allow the buttercream to thaw slightly then re-whip before spreading
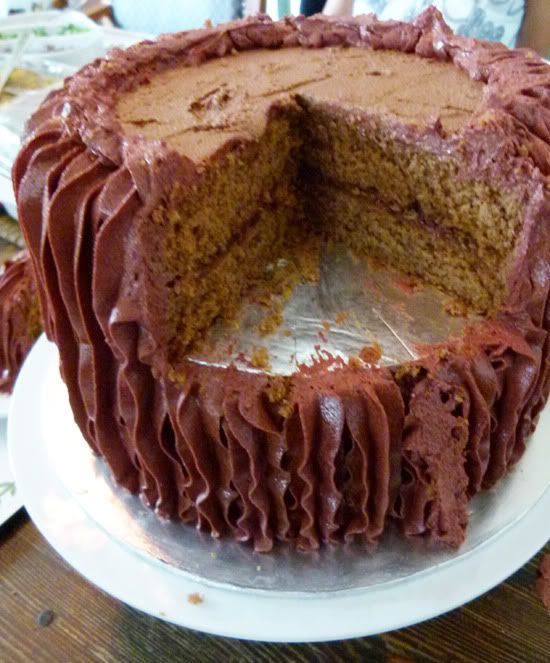
For this particular cake, including frosting and the thin crumb coating, I used 1.5 batches of this icing. It turned out quite well, particularly with the bitter-sweet cocoa powder, as it wasn't as sickeningly sweet as I was afraid it might be. I used a Wilton 1M tip and just drew a line from the bottom of the cake all the way to the top. Check out what it looked like once they'd cut into it. Dear lord.
Unfortunately, no matter how careful you are with baking and wrapping and stacking... and as this was my first time... of course my lowest layer didn't match up with the second layer. I had to patch it up with buttercream, which gave me quite a fright... Then there was the whole process with the dowels, and how they wouldn't stay even! 
Though luckily, everyone left with only one slice to go on the 2nd tier! I took that lowest layer out to my work area, scooped and smoothed and patted down until all we were left with was the barest layer of frosting. I thought, no, no... I'm tossing the rest of this frosting out, there is no way I'm putting any of that anywhere near my already relentless cellulite. So we ended up with two of these (I whipped out the extra layers from the freezer and scooped up enough frosting from the lowest layer to cover that!):
Photobucket
Those just looked so much more... manageable, to me. The frosting started to scare me a bit, and the longer I stared at it, the more paranoid I became! How on earth was that going to affect my ability to fit into clothes, right? 
ARGH. Anyway, enough of all this post-holiday-guilt talk. I'm definitely going to give this stacking business a few more tries, until I get it absolutely perfect! Who knows... I may start using fondant... despite the fact that I hate the taste of it... 
Cheers! 
Nabs 
P.S. Sorry if this post sounded kinda weird, it's just Monday blues, ya know? 

Christmas Tree Ruffle Cake

Photobucket
Ever since I saw this cake by Amanda (aka iammommy) last year, I've been obsessed with it. I've dreamt of the colours, the ruffles, the sweetness of it all... I just needed to wait another year for Christmas. Do you have any idea how frustrating that is? Yes, you probably do. The only thing is that I'm not sure if I'm fond of the texture differences caused by the cake-ception like the one in this picture. So with a year to think about what I want my cake to look like when I finally do it, I think I surprised even myself with how simple it was to make it over-the-top Christmas-sy!
After many, many ruffle cakes over the past year (Elyza's birthday cake, Lana's engagement cake, personal pick-me-up-cos-the-week-was-so-shite cake, and many ruffled cupcakes) the ruffles just came so much easier this time around. I find that when it matters... my frosting and decorating always falls to pieces. This is definitely because I always try to do it all in one sitting, and by the time it comes to piping, I'm exhausted and my eyesight is wonky from the prolonged contact lenses to flour/sugar exposure.
Last weekend was the perfect opportunity to try this out, because a) I had no work to do, and b) mum put me on house arrest for the weekend because of my back problem. Standing and baking all day probably wasn't the best option due to point b) but I'd run out of TV shows, films and books... and wanted to bake.
Photobucket
I used a Wilton #103 tip for the entire cake, and about 1.5 batches of frosting, though next time I should probably use a little less for the crumb coat. There were just SO many crumbs, though, so I kind of went overboard. The housekeeper gave me a tip for that: less baking soda/powder will yield less crumbs. So next time, I'll just try putting in half of what the recipe says. I did up a classic buttercream, but not one I've posted before, so I'll share it now:
Classic Buttercream Recipe
  • 1/2 cup salted butter, softened
  • 1/2 cup Crisco vegetable shortening, room temperature
  • 3-4 cups confectioners sugar, sifted
  • 1 tsp vanilla extract
  • 2 tbsp thickened whipping cream
  • * Colouring gel, as desired
  1. Whip the butter and shortening in a large bowl until fluffy, I find that using a hand mixer as opposed to the stand mixer produces a fluffier and smoother buttercream
  2. Add vanilla, whip a bit more to incorporate
  3. Gradually add the confectioners sugar, 1/2 cup at a time and beating until fully incorporated each time
  4. Depending on the consistency you want to achieve, slowly add the cream. I find that 2 tbsp is perfect, but sometimes depending on other conditions, I may need more or less
  5. Pipe! For ruffles, use a petal decorating tip (#104 for a slightly larger, taller cake though I used a #103) and starting at the bottom of the cake, with the bigger opening on the cake side, at almost right angles with the cake, just dash back and forth all the way up. This video might explain it better.
Photobucket
And when you're done, have cleaned up the kitchen and let the cake sit in the chiller for an appropriate amount of time (which basically equals to enough time for you to shower, get dressed and look presentable)... make yourself a cup of coffee (hold the sugar) and cut a slice of cake.
Photobucket
I don't even need an excuse to bake cakes anymore, my parents are no longer surprised, though they make "tsking" sounds whenever they find the fridge packed with desserts. Every day is cake day!
Photobucket
Especially red velvet cake. Look at how seasonal this cake turned out! My mum didn't see me bake this, and when I cut a slice, it was gratifying to hear her gasp. Yay Christmas!
Anyway, hope you all enjoyed this one, because I'm sort of still on a bit of a high. Love this one so much that I may just make a few replicas to give away...
Happy holidays!
x Nabs

Butter Cupcakes with Buttercream Frosting

Photobucket
I baked this batch of cupcakes at the end of May, it's been that long since I last updated. Mainly due to work, and also some weird personal stuff. Whatever. I made these for a friend's birthday, actually two friends (hehe, I'm sorry, I swear you're both special) who had parties on the same day.
Anyhoo, these tasted a bit weird to me. I don't know... there were several things I wasn't too happy about how these cupcakes turned out. The frosting tasted iffy, and the cake was too buttery (duh... the cake's good on its own, but not with this frosting or in the cupcake format). But by the time I got to taste them, it was time to get ready for the double-booked dinner party night.
Word of advice: don't double book dinner parties. Yea, no shit, Sherlock.
Photobucket
Now I know, that in the event of parties, and if you're baking on the same day, stick with a recipe you know and love.
I suppose I switched things up because for the rose cake I did previously, the frosting didn't hold as well in the humidity. Unfortunately, being on the Equator means I have to adapt a lot of recipes to fit our climate. Lame.
Everyone seemed to like how the cupcakes turned out (and I admit, they're cute!), except my ten-year-old brother and myself. Meh, not a fan of shortening, I suppose.
Recipe:
Butter Cake
  • 1 1/2 cups (200g) self-raising flour
  • Pinch of salt
  • 1 cup (200g) sugar
  • 1 1/4 cup (250g) butter
  • 4 whole eggs
  • 1 tsp vanilla essence
  • 4 tbsp milk
  1. Preheat oven to 180 degrees celcius
  2. Grease and line your pans
  3. Cream butter and sugar, add in eggs one at a time and beat until fully combined
  4. Incorporate milk and vanilla essence
  5. Fold in sifted flour
  6. Pour batter into pans, bake for 30-35 minutes or until an inserted pick comes out clean
Buttercream Frosting Recipe
  • 1/2 cup shortening (GAG)
  • 1/2 cup butter (I'm just going to stick with all butter from now on)
  • and 4 cups of sifted icing sugar
  • 3 tbsp milk (or as needed)
  • (colour as you choose)
  1. Cream the shortening and butter in a bowl until fluffy.
  2. Add the sugar 1/2 cup at a time, and mix for 2-3 minutes before adding more.
  3. When it starts to get stiff, add milk in until you achieve your desired consistency.

I dunno, everyone else seems to be happy with the frosting, so you can give it a shot if you like. I guess I'm just not much of a shortening fan.

The cake's good, though!

x Nabs

Sunday

Cupcake Mania

Photobucket
I've got to work on my self-restraint. Honestly. Maybe I'll start tomorrow.
After frosting my White Roses cake, I found myself with quite a bit of frosting still left on my hands... and I figured... why the hell not bake cupcakes to just use it up?? It would be like making mini versions of the actual cake, that I can give to people who won't be getting a slice of the actual!
Great idea, Nabs!
Only then, one thing led to another and Michelle (my cousin) and Elyza (sister) asked if they could learn how to make cupcakes. I won't even pretend that I agreed because I am a loving sister and cannot say no to those girls (whom I love and adore and would do anything for, just fyi). Nope. I agreed to show them, right then and there, because I was still on a flour high. I wanted to bake, I wanted to combine stuff, and I wanted to enjoy the feel of that mixer whirring under my hand.
HELL YEAH!


... In retrospect, I can understand now why the housekeeper thought I was behaving oddly.

But whatever! We made a batch of cupcakes to match my white cake, using the exact same ingredients only this time in a cupcake pan... And another batch of chocolate cupcakes with raspberry buttercream frosting. You might recall the cake I baked for Adam last weekend... and so did the girls.
Photobucket
Small versions of both!
I don't have a problem, right?
x Nabs

Weekend in a White Garden

Photobucket
What do you get when you combine a simple white cake with fluffy lemon buttercream frosting?
Cellulite.
LOL just kidding (but not really), you get a cake, silly!
During the week, I find myself inexorably drawn towards cooking sites and the cooking sections of the bookstores. I now realize that what I've been doing is storing recipes and getting ideas for what I can bake during the weekends! So this week, I decided I wanted to try a simple white cake as I've never tried one that didn't come out of a box before.
Photobucket
I was also so inspired by Amanda's (from iambaker) rose covered cake that I decided I wanted to give it a shot. My experience with frosting is (as previously stated) very limited, and as such I don't own much equipment for decorating cakes and the such. Fortunately, last week I stumbled upon this amazing store in town called the "International Centre of Cake Artistry". This store supplies everything and anything I could possibly think of using for baking.
This, of course includes a Wilton 1M tip. Let's just leave it at that for now, I don't really feel like telling the internet (which might include my mum) what I bought.
The best thing about having a very large extended family is the fact that there is a birthday to celebrate almost every other week. This might come as a pain if you're one of those people who buy stuff for others, but it's a godsend when you just need an excuse to BAKE. So this week's cake is for the one and only Indera, my beloved cousin who turned 23 on the 18th of May (same as my brother Adam, of last week's cake). You know I don't mean that, Ind, I love you and felt I owe you cake... even if it's not the flavours you mentioned last week.
My roses didn't turn out as beautifully as Amanda's did, of course, as she is a Goddess and I am still a novice. But I had SO much fun doing this!

Basic White Cake
  • 1 cup white sugar
  • 1/2 cup butter (softened, do NOT let it get too liquidy)
  • 2 eggs
  • 2 tsp vanilla extract
  • 1 1/2 cup all-purpose flour
  • 1 3/4 tsp baking powder
  • 1/2 cup milk
  1. Preheat oven to 175 degrees Celsius, grease and flour your baking tray (overdo this bit)
  2. Cream together sugar and butter
  3. Beat in the eggs, one at a time, then stir in the vanilla
  4. Combine flour and baking powder, add to creamed mixture and mix well
  5. Stir in milk until batter is smooth and fluffy
  6. Pour batter into pan
  7. Bake for 30-40 minutes, or 10-20 minutes for cupcakes, or until you poke a stick through the cake and it comes out clean
Lemon Buttercream frosting
  • 2 tbsp freshly squeezed lemon juice
  • 1 tsp lemon zest
  • 4 cups confectioners sugar, sift and sift again
  • 1 cup butter (softened)
  1. Cream the butter until it's fluffy
  2. Add lemon juice and zest, beat well
  3. Gradually add sugar, one cup at a time and continue to beat until creamy
Decorating the cake:

Once the cake is completely cooled - seriously, don't mess with this bit, you make sure that cake is NOT letting off any more heat or your frosting will just melt right off and it's gonna look fug. I had to pop my cake in the fridge for 10 minutes before I could frost mine, cos the humidity here on the Equator does not help with the cooling process. Or the impatience.

Anyhoo, once your cake is cooled and leveled (you don't have to have a very level cake if you don't want to) apply a crumb coating and pop it back in the fridge for a couple of minutes. A crumb coating is just to ensure that any stray crumbs from the cake will be stuck down so it won't come off into your final layer of decoration later.


Attach your Wilton 1M tip, or any large open star tip that you have to your decorating bag (a 16 inch bag should be okay for a 9 inch cake, but it's fine if you don't mind refilling) and fill it with your frosting. I can't possibly describe the method of decorating without sounding like a complete dork (start in the centre and go round and round til you get a cool rose), so I'll leave that to the pro: Check out Amanda's tutorial on this cake.

As you can see, I didn't do so well on the roses on the side of the cake. My first batch of buttercream frosting (yes, I realised I needed two batches for this cake) was a little under the desired consistency (smooth, yet not runny) AND coupled with the fact that it was my first time using the 1M tip and trying to create this rose effect. So the roses are a little shoddy. Also, I didn't space them very well so there's a lot of filler "petals" in there too. Still love it though!

Now I know you're probably thinking "... wait... she didn't mention cupcakes!"

(:

xx Nabs

Tuesday

A post of many firsts

Photobucket
It's my brother's 10th birthday tomorrow, but like I was told recently "You don't need an excuse, Nabs." So I'm going to say this upfront, as much as I love this kid and love spoiling him with sweets, I baked a cake today for my own satisfaction and not really for him. Does that make me a horrible person?
Photobucket
Not that I baked a cake for me to eat, just to enjoy the process of turning seemingly unrelated ingredients into a proper cake. And he's totally going to eat the whole thing anyway, so win-win?
Today was my first attempt at making frosting and a layered cake. It REALLY wasn't as difficult as I thought it would be!
My favourite chocolate cake has always been my aunt Rosa's chocolate cake, and she used to bake my chocolate cakes every single year until my family moved to Gabon for dad's work. Anyhoo, I finally got the recipe for her cake and decided to give it a shot. It didn't turn out as great as hers (obviously, she's a gourmet chef!) but from snacking on the pieces that I cut off (I know, I know... that's horrible but allow me my guilty pleasures) I think it turned out pretty damn good!
Photobucket
As for the buttercream, who knew it would be so simple? I did get a bit worried when I realised how much sugar I kept "gradually" adding to the mix... is that really how much sugar I take in from my regular desserts? Also, I made the rookie mistake of popping my completed frosting into the fridge to preserve it while my cake baked and cooled. BAD IDEA, NABS! I panicked, and thanks to my cooling oven, I managed to get my frosting back in working order by holding the bowl in the open oven to just let it thaw.
Look at that? Doesn't that just look luscious?
Photobucket
Excuse my n00by frosting, like I said, frosting virgin, yadayada. Anyhoo, recipe time:
  • 2 1/2 cups all-purpose flour
  • 3/4 cup cocoa powder (we've always liked Van Houten)
  • 1 tablespoon baking powder
  • 3/4 teaspoon salt
  • 1/2 cup unsalted butter (room temperature)
  • 1 cup maple syrup (room temperature)
  • 2 eggs, lightly beaten
  • 2 teaspoons vanilla (as always, triple this if you want to!)
  • 1 cup milk
  • 8 ounces dark chocolate, finely chopped
  1. Preheat the oven at 170 degrees Celcius, grease and lightly flour your baking pan (I used a small, 6-inch pan this time around)
  2. Whisk flour, cocoa powder, baking powder, and salt in a large bowl (See the blue bowl I'm using here? I just got it today lol)
  3. In a separate bowl whisk the butter and maple syrup. Then whisk in the eggs, vanilla, and the milk
  4. Pour the wet mixture over the flour mixture and stir until barely combined
  5. Add the chocolate and stir until integrated
  6. Pour the batter into the baking pan and bake for 30 - 40 minutes (I went three times to make my three layers)
Photobucket
For this cake, I had to cut the top of the cakes off to level the layers and then allowed them to cool completely before laying on the frosting. For which, the recipe is as below:
  • 1 cup unsalted butter, room temperature
  • 1/2 cup raspberry jam (try getting seedless jam, I couldn't today)
  • 1 16oz packet of powdered sugar
  1. Whisk the butter and jam together until thoroughly mixed
  2. Gradually stir in the sugar until creamy
  3. Finally, to get my frosting as pink as it is, I added three drops of pink colouring
Photobucket
If you have the time, I hope you give this a shot cos chocolate and raspberry is SO good together! OMNOMNOM.

x Nabs