Wednesday

Greek Chicken and Tabouleh Meal Prep


If you follow me on Instagram, you'll notice I'm skipping weeks a bit and have gone from week 1 to week 3. This is because I'm not entirely pleased with how week 2's Korean Beef bowls turned out and I need to tweak the recipe a bit before sharing. 

This one, though, this is a really good one! There are a LOT of components and ingredients but when you actually get down to it, it's really quick and easy to prepare. I also love the lightness and freshness of the whole dish, and the flavours are bright and hits all the high notes. 

I'm definitely going to add this to the rotation for my lunch meal preps, along with the last recipe I shared on Chipotle Chicken. 

Greek Chicken Tabouleh Bowls
Yield: 4 servings 
Time to cook and prepare: 1 hour
Step 1: Prep and Cook the Chicken
Ingredients:
  • 4 boneless skinless chicken breasts
  • 1 tbsp extra virgin olive oil
  • 1 tsp dried oregano
  • 1/2 tsp dried thyme
  • 1/2 tsp dried basil
  • 1/2 tsp onion powder
  • 1/2 tsp garlic powder
  • 1 tsp salt
  1. Combine all ingredients and rub into chicken breasts
  2. Arrange on a foil covered baking tray and cook in a preheated oven at 180°C for 20-25 minutes (depending on the size of the chicken)
  3. Remove from the oven and allow to rest/cool slightly before slicing into them to assemble

Step 2: Assemble the tabouleh
  • 1 bag of cauliflower rice
  • 1/2 medium cucumber, diced
  • 2 medium Roma tomatoes, deseeded and diced
  • 1 1/2 cups parsley, chopped
  • 1/4 cup mint leaves, chopped
  • 2 green onions, white and pale parts only, thinly sliced
  • 1 garlic clove, minced (I use a garlic crusher)
  • 2 tbsp extra virgin olive oil
  • 1/4 tsp lemon zest
  • 2 tbsp fresh lemon
  • 1/4 tsp chili flakes
  • Season to taste
  1. Mix everything together in a large bowl
Step 3: Make the Tzatziki 
  • 1 cucumber, peeled and grated
  • 1 cup plain Greek yoghurt
  • 2 large garlic cloves, minced (again, the crusher)
  • 1 tbsp white vinegar
  • 1/2 tsp salt
  • 1 tbsp dill (I had to use dried as the supermarket was out of fresh)
  1. Combine all ingredients and resist the temptation to eat it all with a bag of crisps! 
Step 4: Assemble!

Tuesday

Cravings for Chipotle


I made a huge mistake when I went to the States for work last year - I went to a Chipotle Mexican Grill branch for lunch. I remember suffering from a particularly awful bout of jetlag, was close to being sick at one point but I just needed some food inside my belly before I went back to my hotel room and passed out. There was a Chipotle just around the corner from where I was staying in SF, and I walked over... and boy oh boy, despite how I felt, I finished everything!

Now here's why it was a mistake: I live in Malaysia - all the way on the other side of the world from a Chipotle... the only thing close to this here is Chili's, and well... come on, it just doesn't compare. So what's a girl to do but try to recreate some of their recipes?

Lucky for me, there's no shortage of helpful recipe hackers on Pinterest and I pulled together various recipes to form what is fast becoming one of my favourite meals of all time. Also, this is definitely one of my top 3 recipes for chicken!


Pollo en Adobo with Cilantro Lime Quinoa and Cilantro Lime vinaigrette
I don't know which one of these 3 components I love most! I lie, it's the chook. 

The Chicken:
  • 4 - 6 boneless, skinless chicken breasts
  • Juice of half a lime
  • a handful of fresh cilantro leaves, chopped
  • 2 chipotle peppers in adobo, minced (use a fork!)
  • Fajita seasoning*
  • 1/4 cup olive oil
  1. Slice the chicken breasts in half across so you get thinner strips and they cook faster
  2. Mix the lime juice, cilantro, chipotle peppers, fajita seasoning and olive oil and marinade the chicken for about an hour
  3. Preheat the oven at 180°C, then cook your chicken breasts on a foil covered baking tray for about 15 minutes
  4. Remove from heat, allow to rest before slicing into chunks to serve
The Quinoa (you can easily substitute this for rice):
  • 1 cup quinoa/rice
  • 2 cups water (adjust according to rice - see notes below)
  • Juice of 1 lime
  • 1 tsp lemon juice
  • 1 tsp salt
  • 1 tbsp fresh cilantro
  1. Cook the quinoa or rice in the water, with salt and the juices from the lime and lemon
  2. Once cooked, fluff up and stir in your chopped cilantro
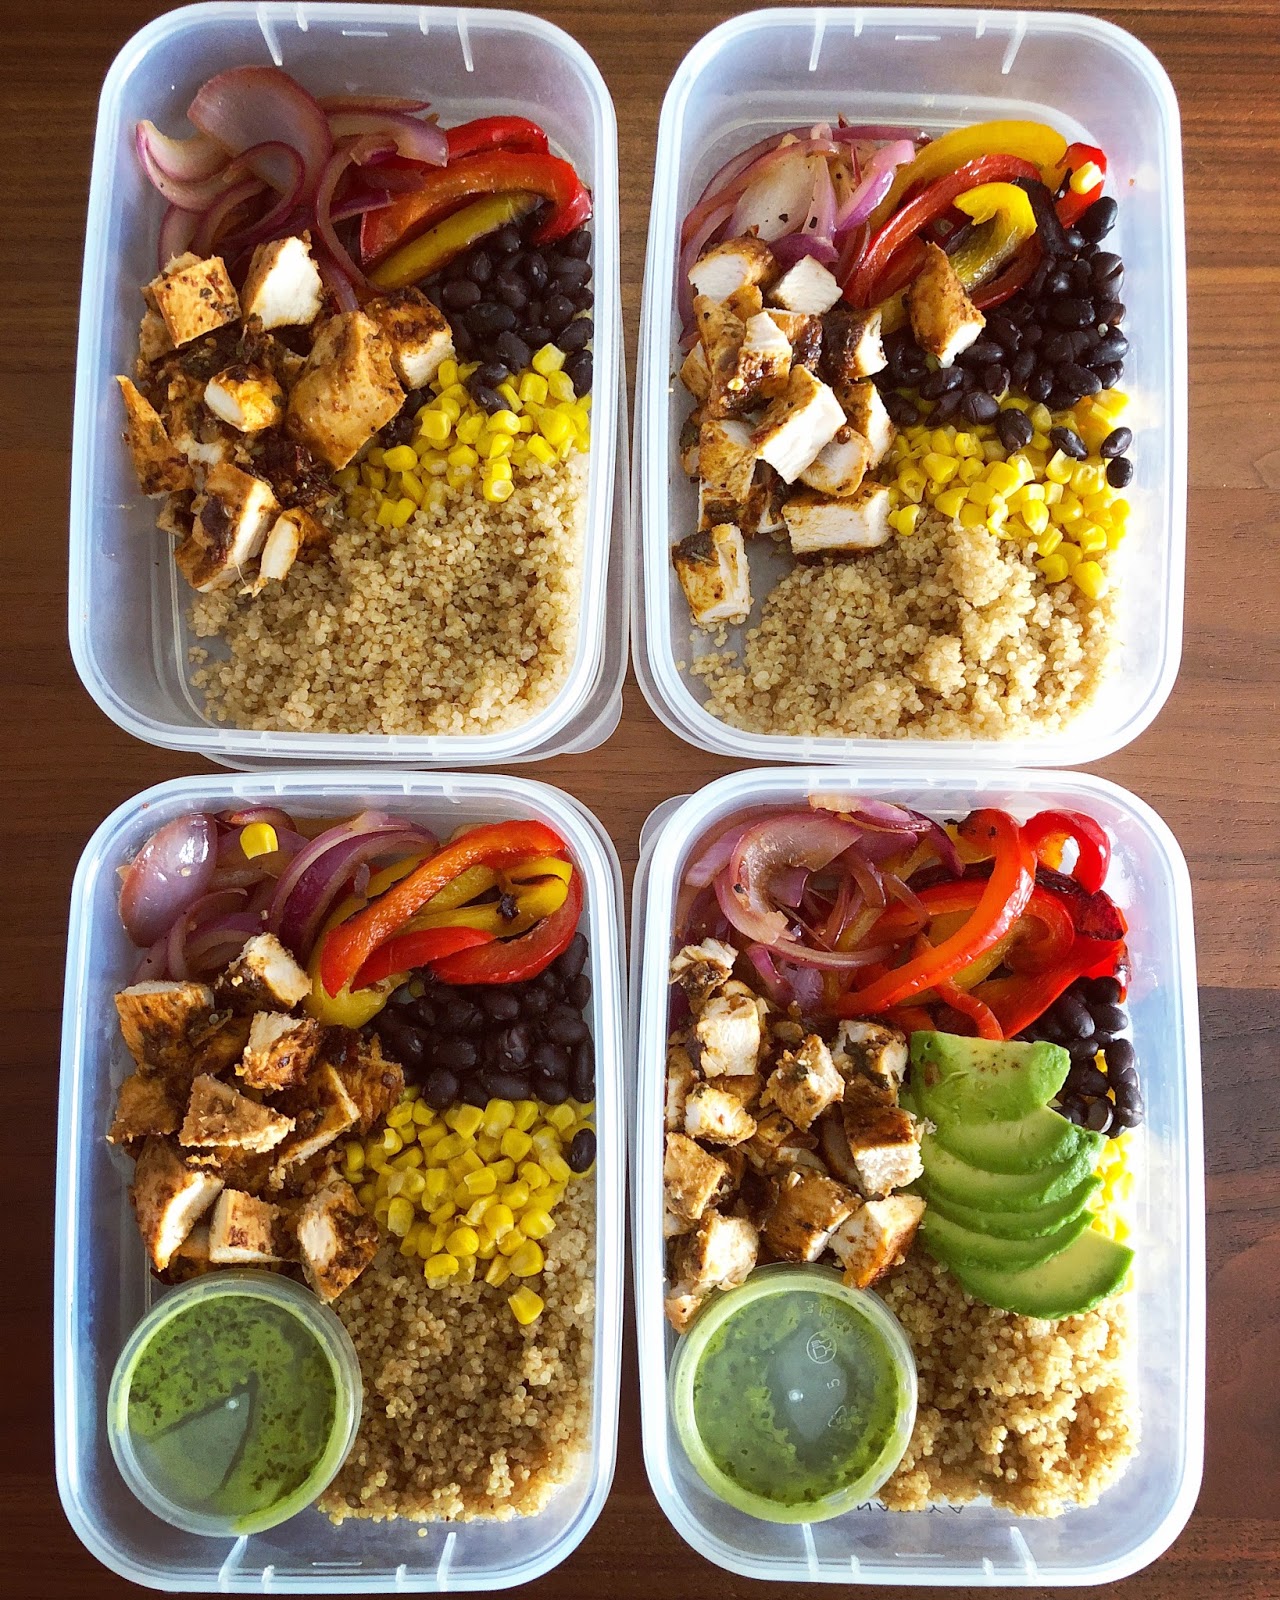
The Cilantro Lime Vinaigrette (pictured above)
  • 1/3 cup olive oil
  • 2 tbsp water
  • 2 handfuls cilantro
  • Juice of 2 limes (or 1/2 a lemon if you prefer)
  • 2 cloves garlic, diced
  • 1/4 tsp salt
  • 1 tsp honey
  • 2 tbsp red wine vinegar
Blend it all together with an immersion blender and pour over the rice and chicken

For my meal prepped lunches, I also sauteed some red onions and green and red peppers, throw in some toasted tinned corn kernels and rinsed black beans (also from a tin). I can't for the life of me remember what I put in the peppers and onions, but both were quite basic and I tend to use an olive oil and butter base with some chili powder, salt and pepper. Sorry! Will update if I find my notes!

*Fajita seasoning: you can use the pre-packed stuff, which I do in a pinch, or save some money and make your own batch as below:
1 tbsp each of:
  • Chili powder
  • Ground cumin
  • Ground oregano
  • Smoked paprika
  • Onion powder
  • Garlic powder
  • Cayenne pepper
  • 1/2 tbsp each of salt and pepper
Notes for rice:
There are 3 main types of rice (that are most common in home cooking) - long grain (like Basmathi and Jasmine rice), short grain (usually like sushi rice, arborio, Thai sticky rice, etc) and brown rice (it's ... brown). When cooking your rice, your ratio of water to rice and cooking times will vary depending on which type you're going with.
First tip - read the package for instructions. Usually can't go wrong there.
If there are no instructions, I tend to go with the following ratios and cooking times:
  • Long-grain rice: 1 cup rice:2 cups water; I usually cook it for 15 minutes covered on low after the initial boil
  • Short-grain rice: 1 cup rice:1 cup+2 tbsp water; cook covered and bring to a boil, then lower the heat and cook for another 5 minutes. THEN leave it covered off the heat for 10 minutes - DON'T PEEK
  • Brown rice (long-grain): 1 cup rice:2 cups water; bring to boil, then reduce heat to a very low simmer and cover and cook for 45 minutes. Take the rice off the heat and let it continue to cook in its own steam for another 10 minutes
I shall, of course, caveat this by saying... I'm no expert rice maker and it's touch and go for me most times! 

If you have a rice cooker, well bully for you! I have yet to get one despite living in this house for 2 years and being Asian. This really is due to the fact that my kitchen is tiny and I only have 2 power points - don't ask me, my theory is the people who designed this apartment building don't cook. 

Looking forward to moving into our new place and having a kitchen to be my very own playground!

Wednesday

Brownies Ratio Analysis


I work in an investment fund and we look at financial ratios and other boring stuff all day long. So when I walked into the office with a box of brownies and said "I couldn't sleep last night so I was experimenting with ratios -" before I could finish my sentence, my colleagues gave incredulous "why would you do that in the middle of the night?!"

Hehehe I was working on the ONLY ratios that matter - the fat to flour content in determining the texture of brownies you get.

So in my attempt to find my absolute favourite brownie recipe, I decided to make all 3 variations to test them with various friends, family and colleagues and let them decide which one is best.


In making brownies, what determines it being cakey or fudgy is the amount of fat (chocolate and flour) versus the amount of flour that you put into the batter. Obviously, more fat means more fudgy, rich and wet, and vice versa.

Then, tweak yet another variable - the type of sugar - and you get chewy brownies!

The ingredients themselves don't change, but the ratios do and so to make it easy for you I've put the recipe in a table:


The winner for me though, definitely fudgy brownies! Especially when they're warm and paired with a glass of cold milk. YUM! 


Monday

Ricotta Apple Cake


I was meant to do a bit of a brownie experiment this weekend - had planned it out perfectly except for one thing... I forgot to buy eggs. What the hoohay? So I had only 3 eggs on hand and a hankering to bake this evening and quickly pivoted from the brownie experiment plan to make this stunning cake I had seen on Food52's instagram. It's called Louisa's Cake, an elegantly simple recipe to pull off yet yields such wonderful results.


It's made with just a small bundle of ingredients, and chances are you will only need to run to the shops to get just two items - a fresh crunchy green apple and a tub of ricotta. It's also so easy, that I made two this weekend! One for Kak Yati's birthday, and another to bring to dinner at my sister-in-law's place.

I'll save the brownie experiment for another night this week, and I'd really still like to do it before I fly off this Thursday for my 30th birthday weekend getaway. Oh well, who needs sleep? I'm still in my 20s, I'm sure I could pull it off! Hehehe


Recipe for Louisa's Cake or a Ricotta Apple Cake
From Food52
  • 117g butter, room temperature
  • 225g caster sugar
  • 3 large eggs, room temperature
  • 1 tsp vanilla extract
  • 250g fresh ricotta
  • 1 large green apple, peeled and shredded (and squeezed of excess moisture)
  • Zest of 1 lemon
  • 160g all purpose flour
  • 1 tbsp baking powder
  • Pinch of salt
  1. Preheat the oven to 180C and line a 9" springform tin with parchment paper 
  2. Beat the butter and sugar until creamy, then add the eggs in one at a time while mixing on low speed
  3. Add the vanilla then beat in the ricotta, apple and lemon zest and continue to beat the mixture until combined (1-2 mins on low speed)
  4. Add the flour, baking powder and salt and fold in with a spatula until the dry ingredients are just wet then pour the batter out into the prepared tin and bake for 35 minutes (fan) 
  5. Cool the cake in the tin for about 10 minutes then move to a wire rack and cool completely before dusting with icing sugar and then cutting a slice out to "photograph" but really it was just in time for the hot mug of coffee you just made.